NETCONF XML Payload with YANG models
In this blog post I would like to explain how to create proper XML payload using the Native YANG model and the OpenConfig YANG model for IOS-XE and NX-OS to send configuration data to the devices with NETCONF. At this point you will ask yourself why should I use NETCONF with creepy XML payload and complicated YANG models to configure my network devices when there are many other easier ways to do it? You might be right but first of all, let’s briefly describe NETCONF with the a little help from RFC6241 and then take a look at the one big advantage.
The Network Configuration Protocol (NETCONF) provides mechanisms to install, manipulate, and delete the configuration of network devices. It uses XML-based (Extensible Markup Language) data encoding for the configuration data and the protocol messages. A secure, connection-oriented session is established using remote procedure calls (RPC) between a client which is your workstation for example and a server which is the network device. The NETCONF protocol provides a set of operations to manage device configurations (get-config, edit-config, copy-config, delete-config) and retrieve device state data (get). As the CLI was made for humans interacting with the devices, NETCONF was made for machines interacting with machines. For more detailed information about NETCONF I encourage you to read through RFC6241 which is well written with good examples.
A big advantage of using NETCONF to manage your network device configuration is the transactional behavior. Let’s assume you’re going to configure a network device manually with a prepared configuration part in a text editor to be copied and pasted into the CLI like we all were doing in the past. When there is an error in your configuration while pasting it to the CLI of the device you will end up with a partial configuration which could case serious issues.
Nexus1# conf t
Enter configuration commands, one per line. End with CNTL/Z.
Nexus1(config)# int ethernet1/10
Nexus1(config-if)# ip address 10.0.50.3/24
                        ^
% Invalid command at '^' marker.
Nexus1(config-if)#
Example 1: Pasting commands from a text editor with error.
NETCONF’s transactional behavior ensures that the configuration will only be applied when every bit of it is correct. As soon as there’s a wrong bit which is not accepted by the device, the whole configuration you wanted to be applied is refused. This mechanism provides a robust and resilient way to configure devices.
As described before, in this blog post I will focus only on a small part of NETCONF which is the creation of proper XML configuration data to be used with the edit-config operation to push the configuration to the device. I will show you the following three different options for the XML payload:
✅ IOS-XE config with Native YANG
✅ IOS-XE config with OpenConfig YANG
✅ NX-OS config with Native + OpenConfig YANG
For the NETCONF communication between the client (my workstation) and the server (the network devices) I will take advantage of the Python library ncclient. The following diagram shows the lab setup in Cisco Modeling Labs I am using for the example.
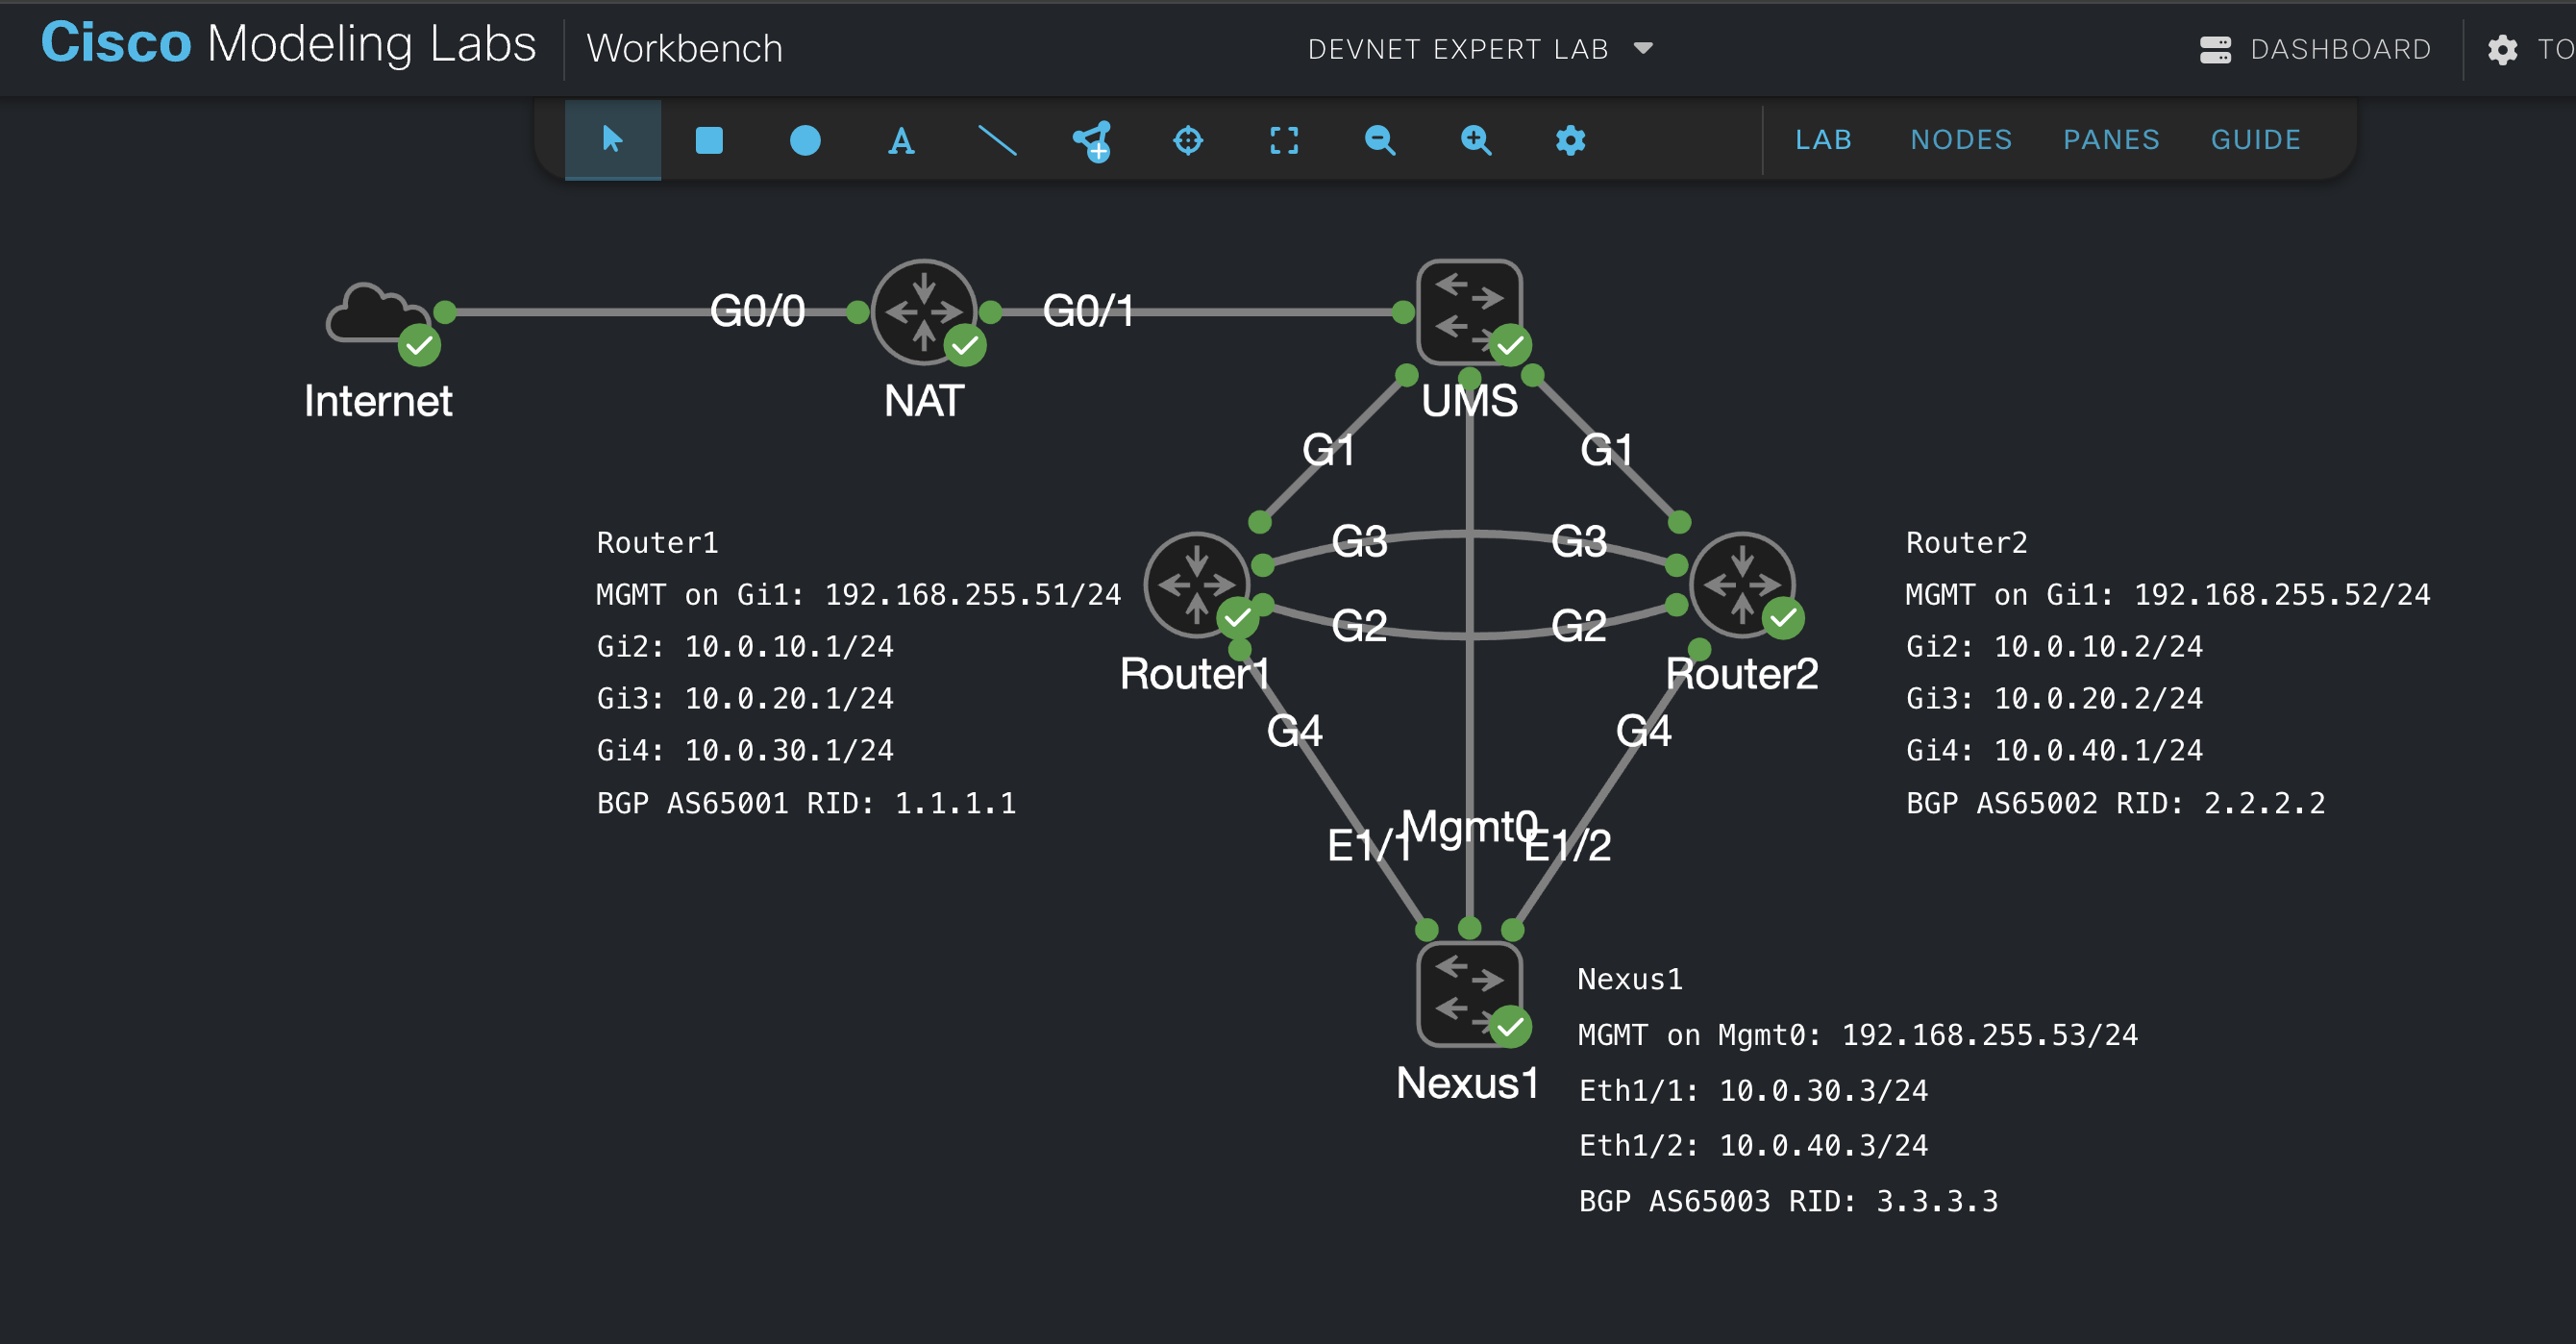 Screenshot 1: NETCONF Lab overview in Cisco Modeling Labs.
For the initial lab setup please refer to my DevNet Expert Lab on Cisco Modeling Labs GitHub repository. There are only the management interfaces and some basic features configured, everything else like the interfaces with IP addressing and BGP configuration will be done via NETCONF.
Before communicating with the devices using NETCONF, the NETCONF Agent must be enabled. The NETCONF Agent is enabled or disabled by entering the netconf-yang command on IOS-XE and feature netconf command on NX-OS. Additionally you need to enable OpenConfig on NX-OS using the feature openconfig command. Make sure you have users with appropriate privileges configured on your devices that is privilege level 15 on IOS-XE and network-admin or dev-ops role on NX-OS. You need connectivity from your workstation via SSHv2 on TCP port 830. NETCONF does not support SSH version 1. That’s all part of the initial lab configuration in my example.
Intro to Cisco YANG Suite
The XML configuration data, also named payload, will be created with the help of Cisco YANG Suite. It provides a set of tools and plugins to learn, test, and adopt YANG programmable interfaces such as NETCONF, RESTCONF, gNMI and more. I am using the DevNet Expert Candidate Workstation VM on which Cisco YANG Suite is already installed and is available on http://localhost:8480. For installation option please refer to the Cisco YANG Suite documentation.
If it is your first time running YANG Suite, you should start at the Getting Started section from the documentation and create Device profiles and download the supported YANG models from the devices or upload YANG model files from your workstation or from public YANG Github repository at the Setup menu on the right. After that you can create YANG module sets for IOS-XE and NX-OS with the supported modules you need.
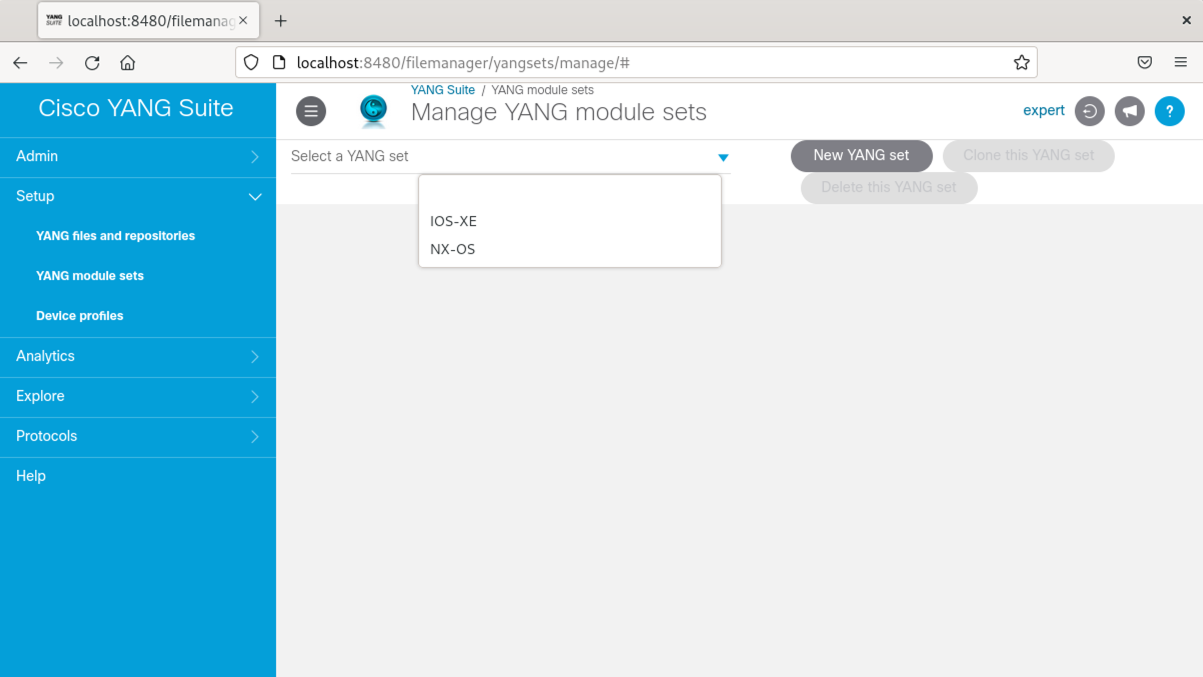 Screenshot 2: Module Sets in YANG Suite.
Now we can take a closer look how to create the XML payload and use these models to send NETCONF at Protocols –> NETCONF in YANG Suite.
Create XML Payloads with Cisco YANG Suite
Router1 - XML config payload using the Native YANG model for IOS-XE
Let us start with creating the XML configuration payload for the IOS-XE Router1 using the Native YANG model. Go to Protocols –> NETCONF in YANG Suite, select IOS-XE on the YANG Set from the Dropdown menu, search and select the Cisco-IOS-XE-native module and load the modules. Then choose the NETCONF operation, <edit-config> in our case, and select Router1 as device. Before we start browsing through the YANG tree, click on the “YANG Tree -> Options” and choose NETCONF XML (RPC parameters only) from Display as RPC(s) as to show only the configuration payload parameters.
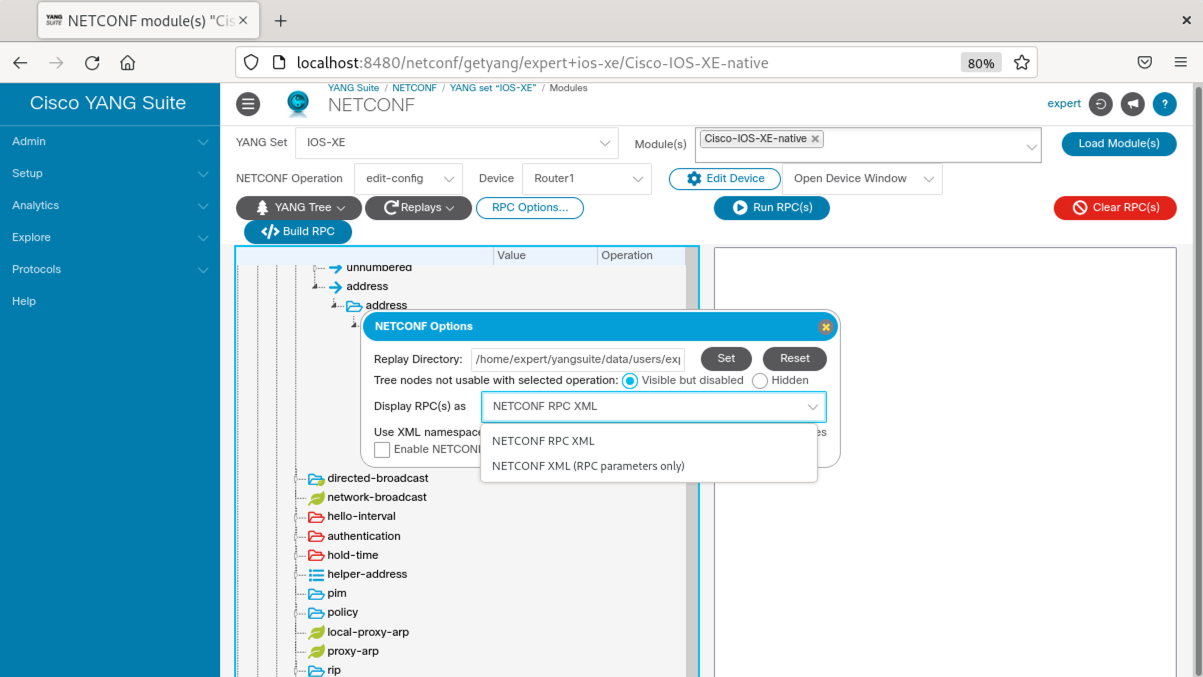 Screenshot 3: YANG Tree Settings in YANG Suite.
Now we can start browsing the YANG tree and look for the interfaces container. Unfortunately there is no option to sort the YANG tree in alphabetical order, therefore I recommend using the search option from the browser. Expand the interfaces container, look for the GigabitEthernet list element and expand it. The small key symbol at the name leaf tells you that this leaf is the key of the list item and mandatory. Add the interface number 2 in the value field of the name. Another important setting is the shutdown leaf which has only a checkbox. Check the box in the Value column and add the remove operation in the Operation column. This setting enables the interface and is the equivalent to the no shutdown CLI command.
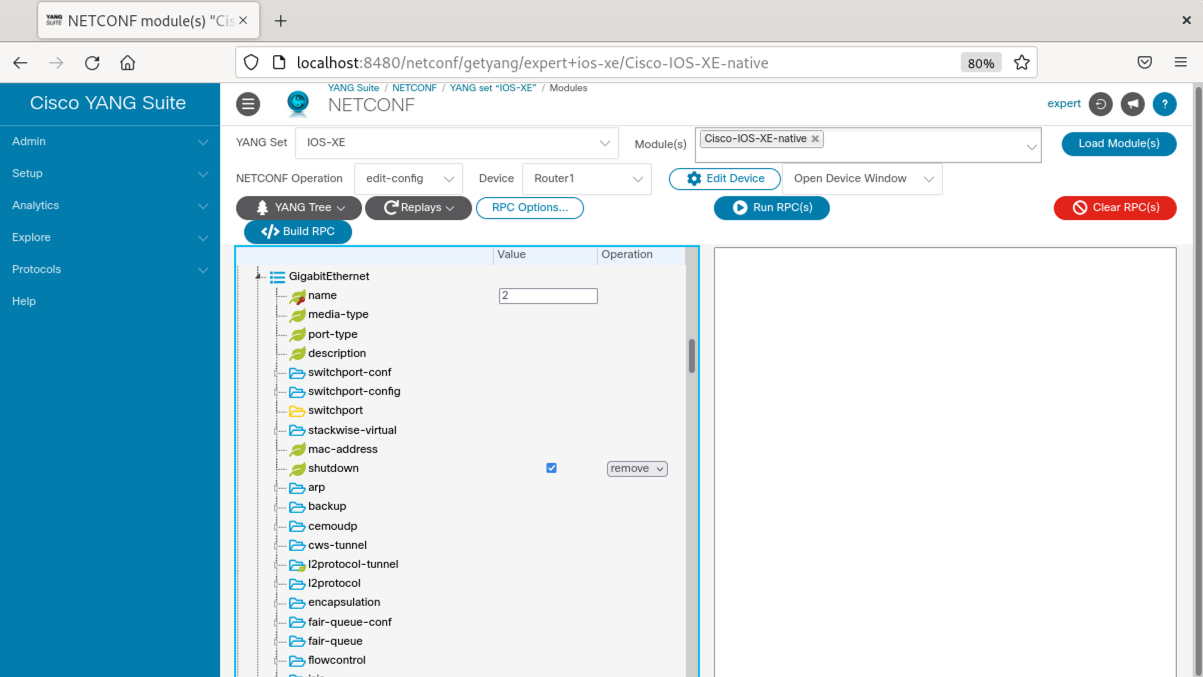 Screenshot 4: GigabitEthernet list from interface container of the Cisco-IOS-XE-native module.
Scroll further down to the ip container, expand it, and then choose address-choice -> address -> address -> address-choice -> fixed case -> primary. Add the IP address 10.0.10.1 at the address leaf and the subnet mask 255.255.255.0 at the mask leaf. After that click Build RPC and the XML config payload is generated on the right side.
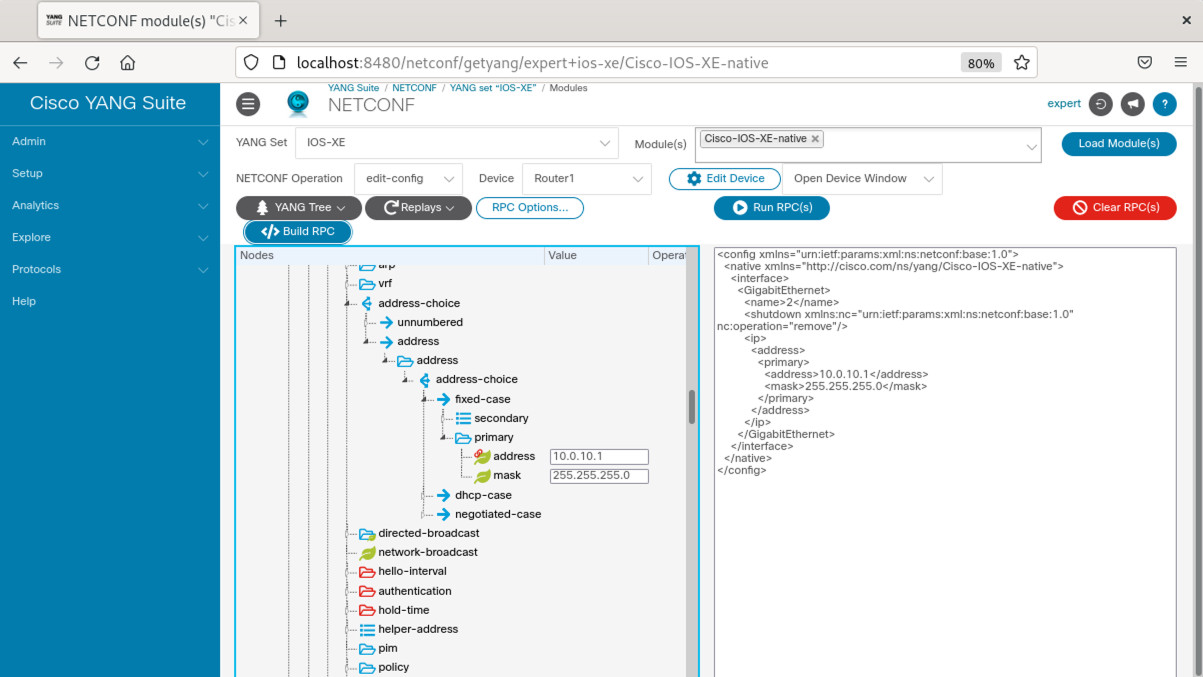 Screenshot 5: First XML config payload for interfaces from the Cisco-IOS-XE-native module.
You could use YANG Suite now to do a RPC to Router1 in a new browser tab and send the payload when clicking on Run RPC(s). But for now we move on to the BGP configuration part which can be found at the router container and the ios-bgp:bgp list element. The leaf ios-bgp:id is the key and it represents the AS number 65001 in our case. Expand the list element ios-bgp:neighbor, add the neighbor ID 10.0.10.2 as value of the ios-bgp:ip leaf item, and add 65002 to the ios-bgp:remote-as leaf item. Click the red Clear RPC(s) button to clear the XML payload section before clicking Build RPC(s) again otherwise the new added XML payload data will be added to the existing data instead of re-creating the whole thing.
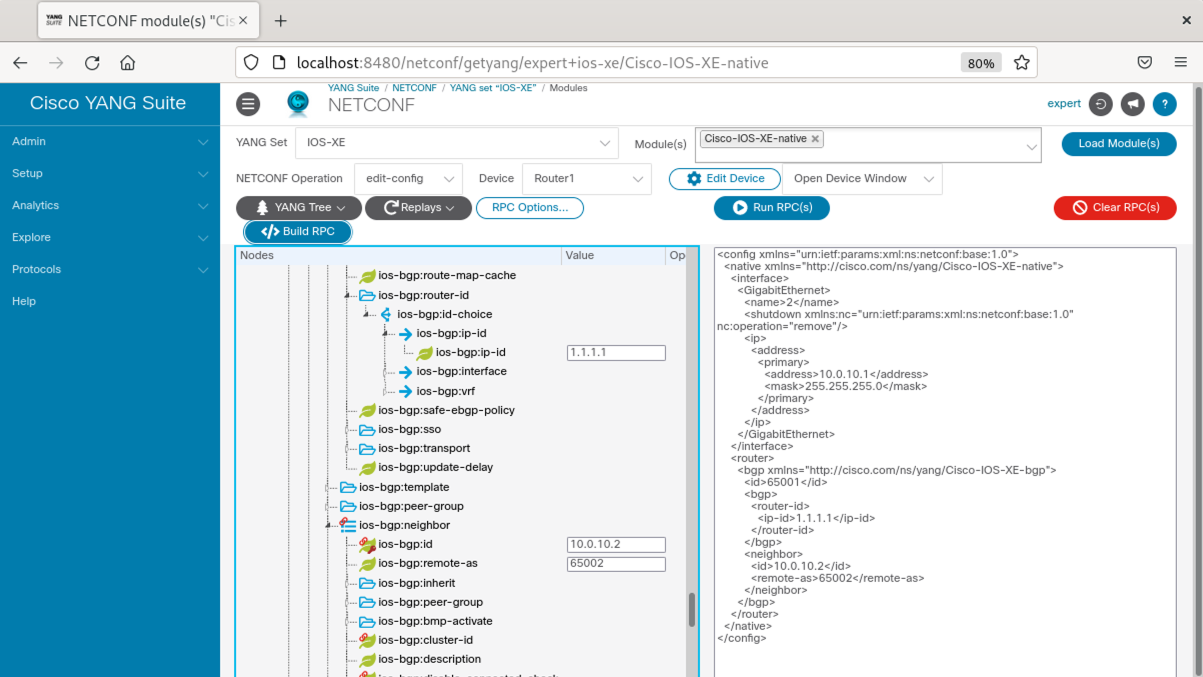 Screenshot 6: All XML config payload parts from the Cisco-IOS-XE-native module.
Now we have all XML payload configuration parts ready. Then we can replicate what we have put together so far for the other interfaces and BGP neighbors to create the full XML configuration payload for Router1:
<config xmlns="urn:ietf:params:xml:ns:netconf:base:1.0">
  <native xmlns="http://cisco.com/ns/yang/Cisco-IOS-XE-native">
    <interface>
      <GigabitEthernet>
        <name>2</name>
        <shutdown xmlns:nc="urn:ietf:params:xml:ns:netconf:base:1.0" nc:operation="remove"/>
        <ip>
          <address>
            <primary>
              <address>10.0.10.1</address>
              <mask>255.255.255.0</mask>
            </primary>
          </address>
        </ip>
      </GigabitEthernet>
      <GigabitEthernet>
        <name>3</name>
        <shutdown xmlns:nc="urn:ietf:params:xml:ns:netconf:base:1.0" nc:operation="remove"/>
        <ip>
          <address>
            <primary>
              <address>10.0.20.1</address>
              <mask>255.255.255.0</mask>
            </primary>
          </address>
        </ip>
      </GigabitEthernet>
      <GigabitEthernet>
        <name>4</name>
        <shutdown xmlns:nc="urn:ietf:params:xml:ns:netconf:base:1.0" nc:operation="remove"/>
        <ip>
          <address>
            <primary>
              <address>10.0.30.1</address>
              <mask>255.255.255.0</mask>
            </primary>
          </address>
        </ip>
      </GigabitEthernet>
    </interface>
    <router>
      <bgp xmlns="http://cisco.com/ns/yang/Cisco-IOS-XE-bgp">
        <id>65001</id>
        <neighbor>
          <id>10.0.10.2</id>
          <remote-as>65002</remote-as>
        </neighbor>
        <neighbor>
          <id>10.0.20.2</id>
          <remote-as>65002</remote-as>
        </neighbor>
        <neighbor>
          <id>10.0.30.3</id>
          <remote-as>65003</remote-as>
        </neighbor>
      </bgp>
    </router>
  </native>
</config>
Example 2: Complete XML config payload for Router1 from IOS-XE native model.
So far so good. The complete XML config payload for Router1 from IOS-XE native models is ready. Now let us move on to the XML configuration payload for Router2, but this time we will use the OpenConfig YANG model.
Router2 - XML config payload using the OpenConfig YANG model for IOS-XE
For the usage of OpenConfig YANG modules you need to choose all the single modules you need to build XML payload for and not only the single native module like we did for Router1 before. We select IOS-XE on the YANG Set from the Dropdown menu, but this time we search and select the following OpenConfig YANG modules:
- openconfig-interfaces
- openconfig-if-ip
- openconfig-network-instance
- openconfig-policy-types
You can find out how the various modules are linked together by using right click on the mouse while on a module in the YANG tree and choose properties. There is a lot of useful information about the modules and which other submodules linked to it. The same option is available from left menu at Explore -> YANG where you can load the individual modules and explore the details.
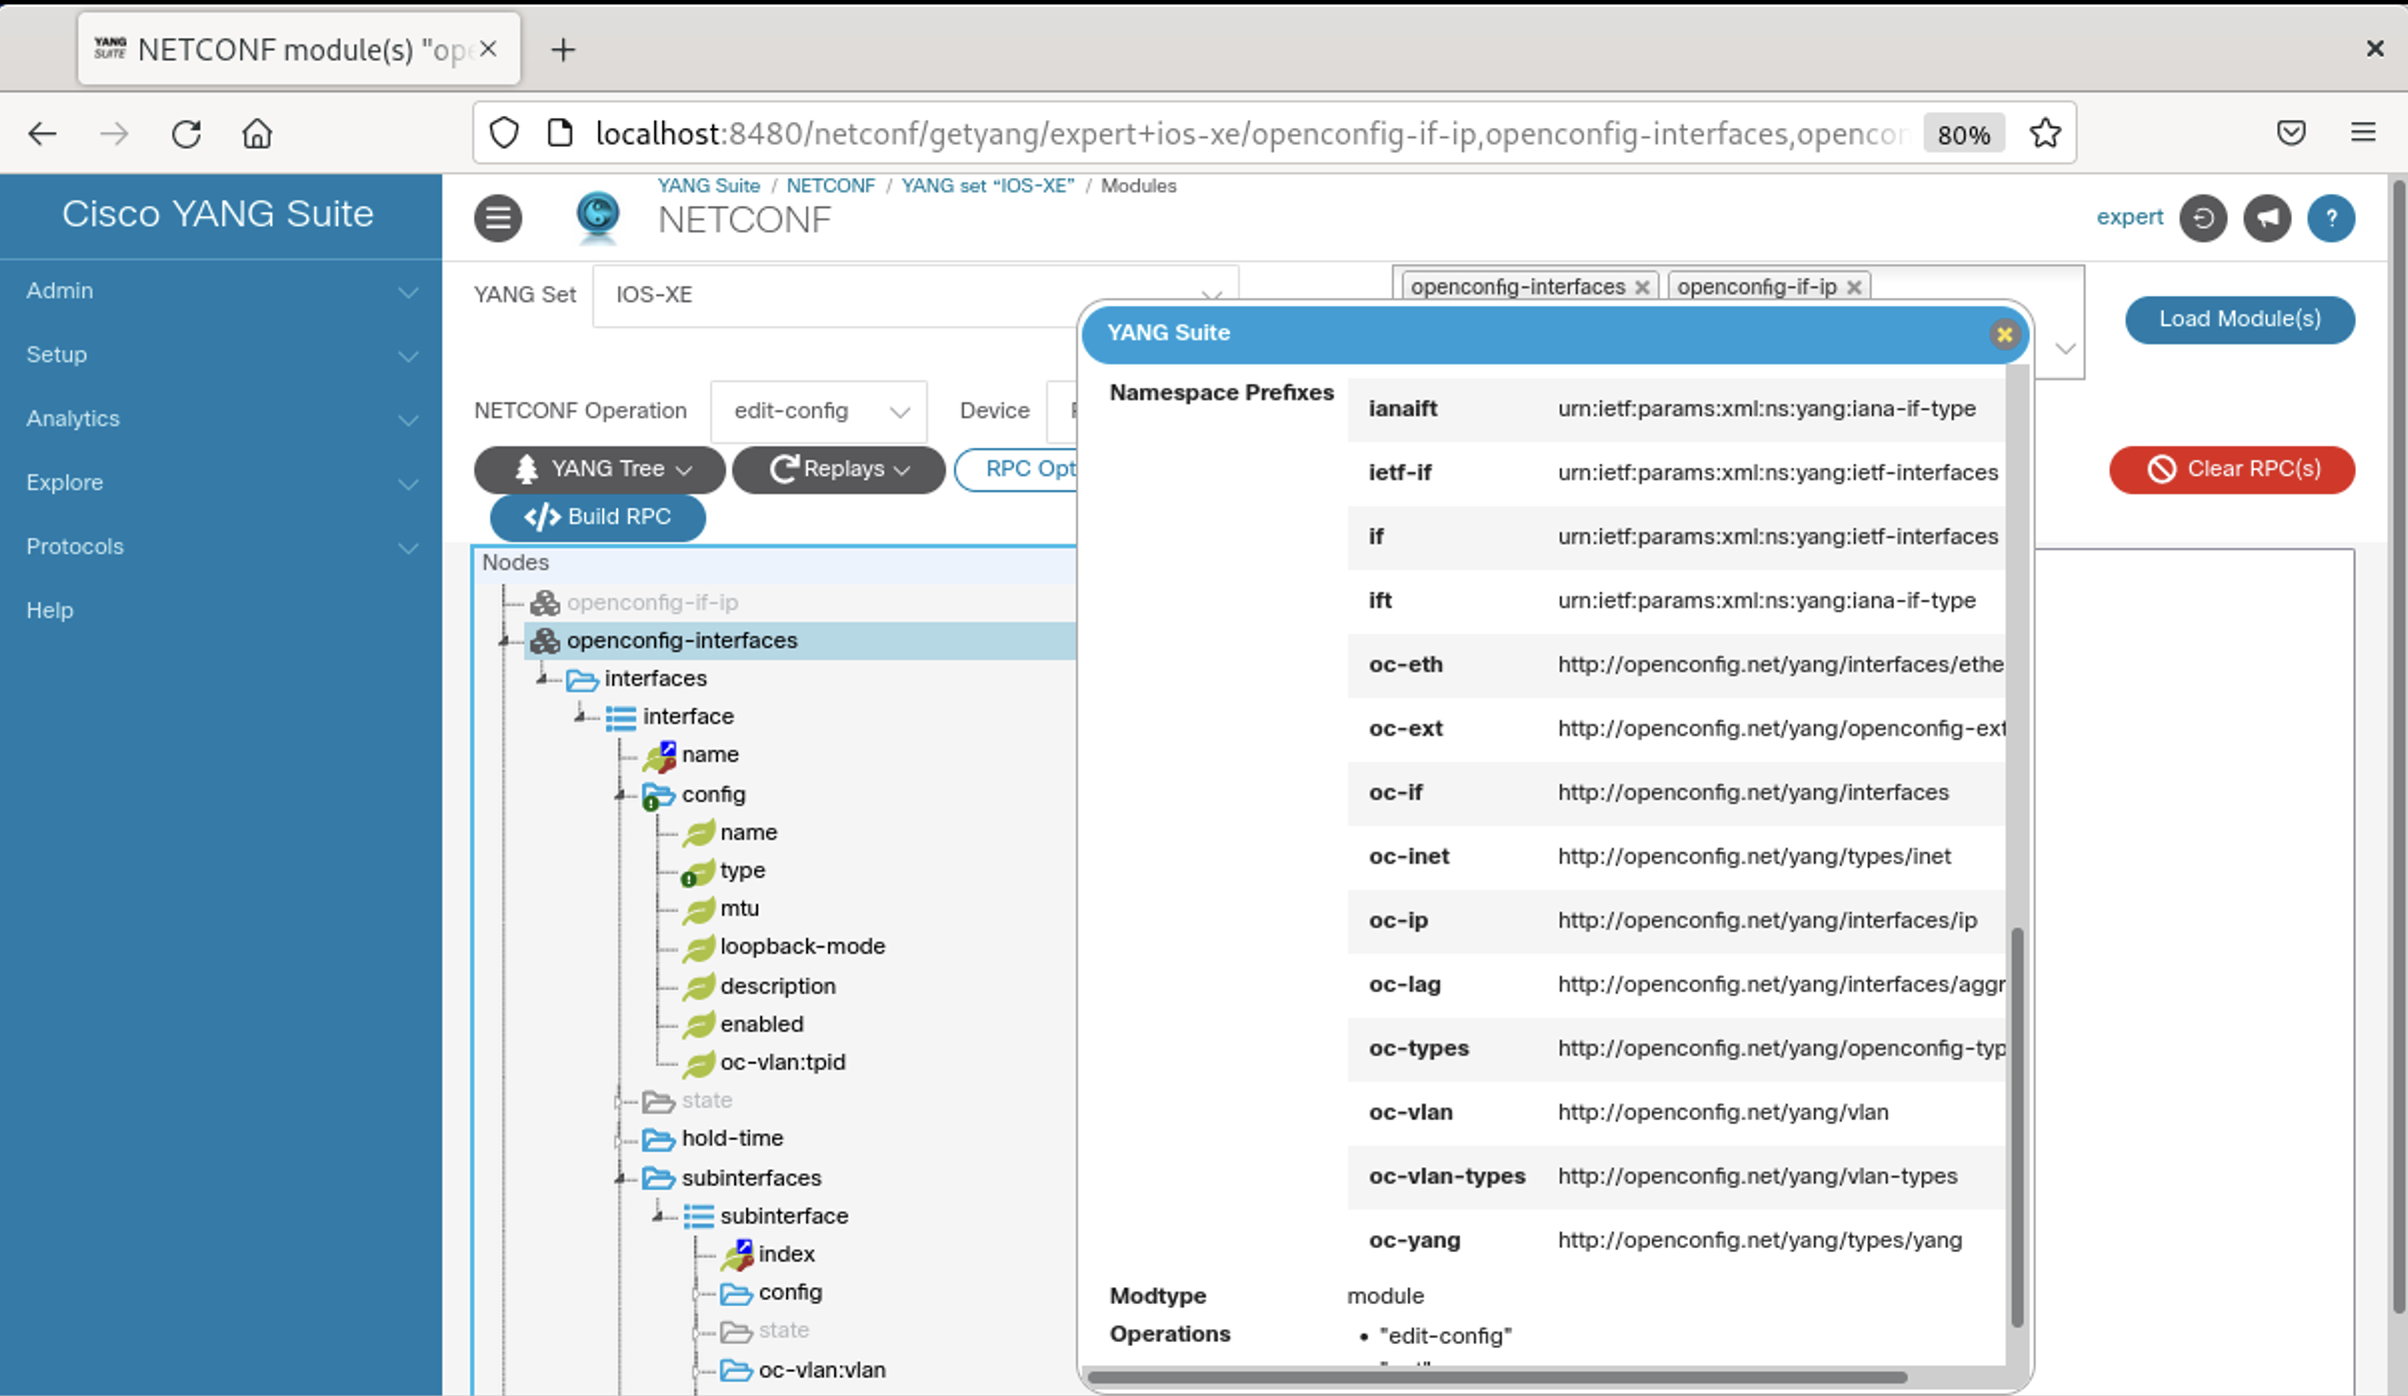 Screenshot 5: OpenConfig YANG Module properties
Load the modules and make sure you selected the NETCONF operation <edit-config>. You do not need to select a device as we will not do NETCONF RPC from YANG Suite for now. Expand the openconfig-interface module as well as the interfaces container and the interface list element. Add the name GigabitEthernet2 which is the key of the list element like it was for the native model. Expand the config container, add gain the interface name, choose ianaift:ethernetCsmacd for the type leaf, and select true for the enabled leaf element.
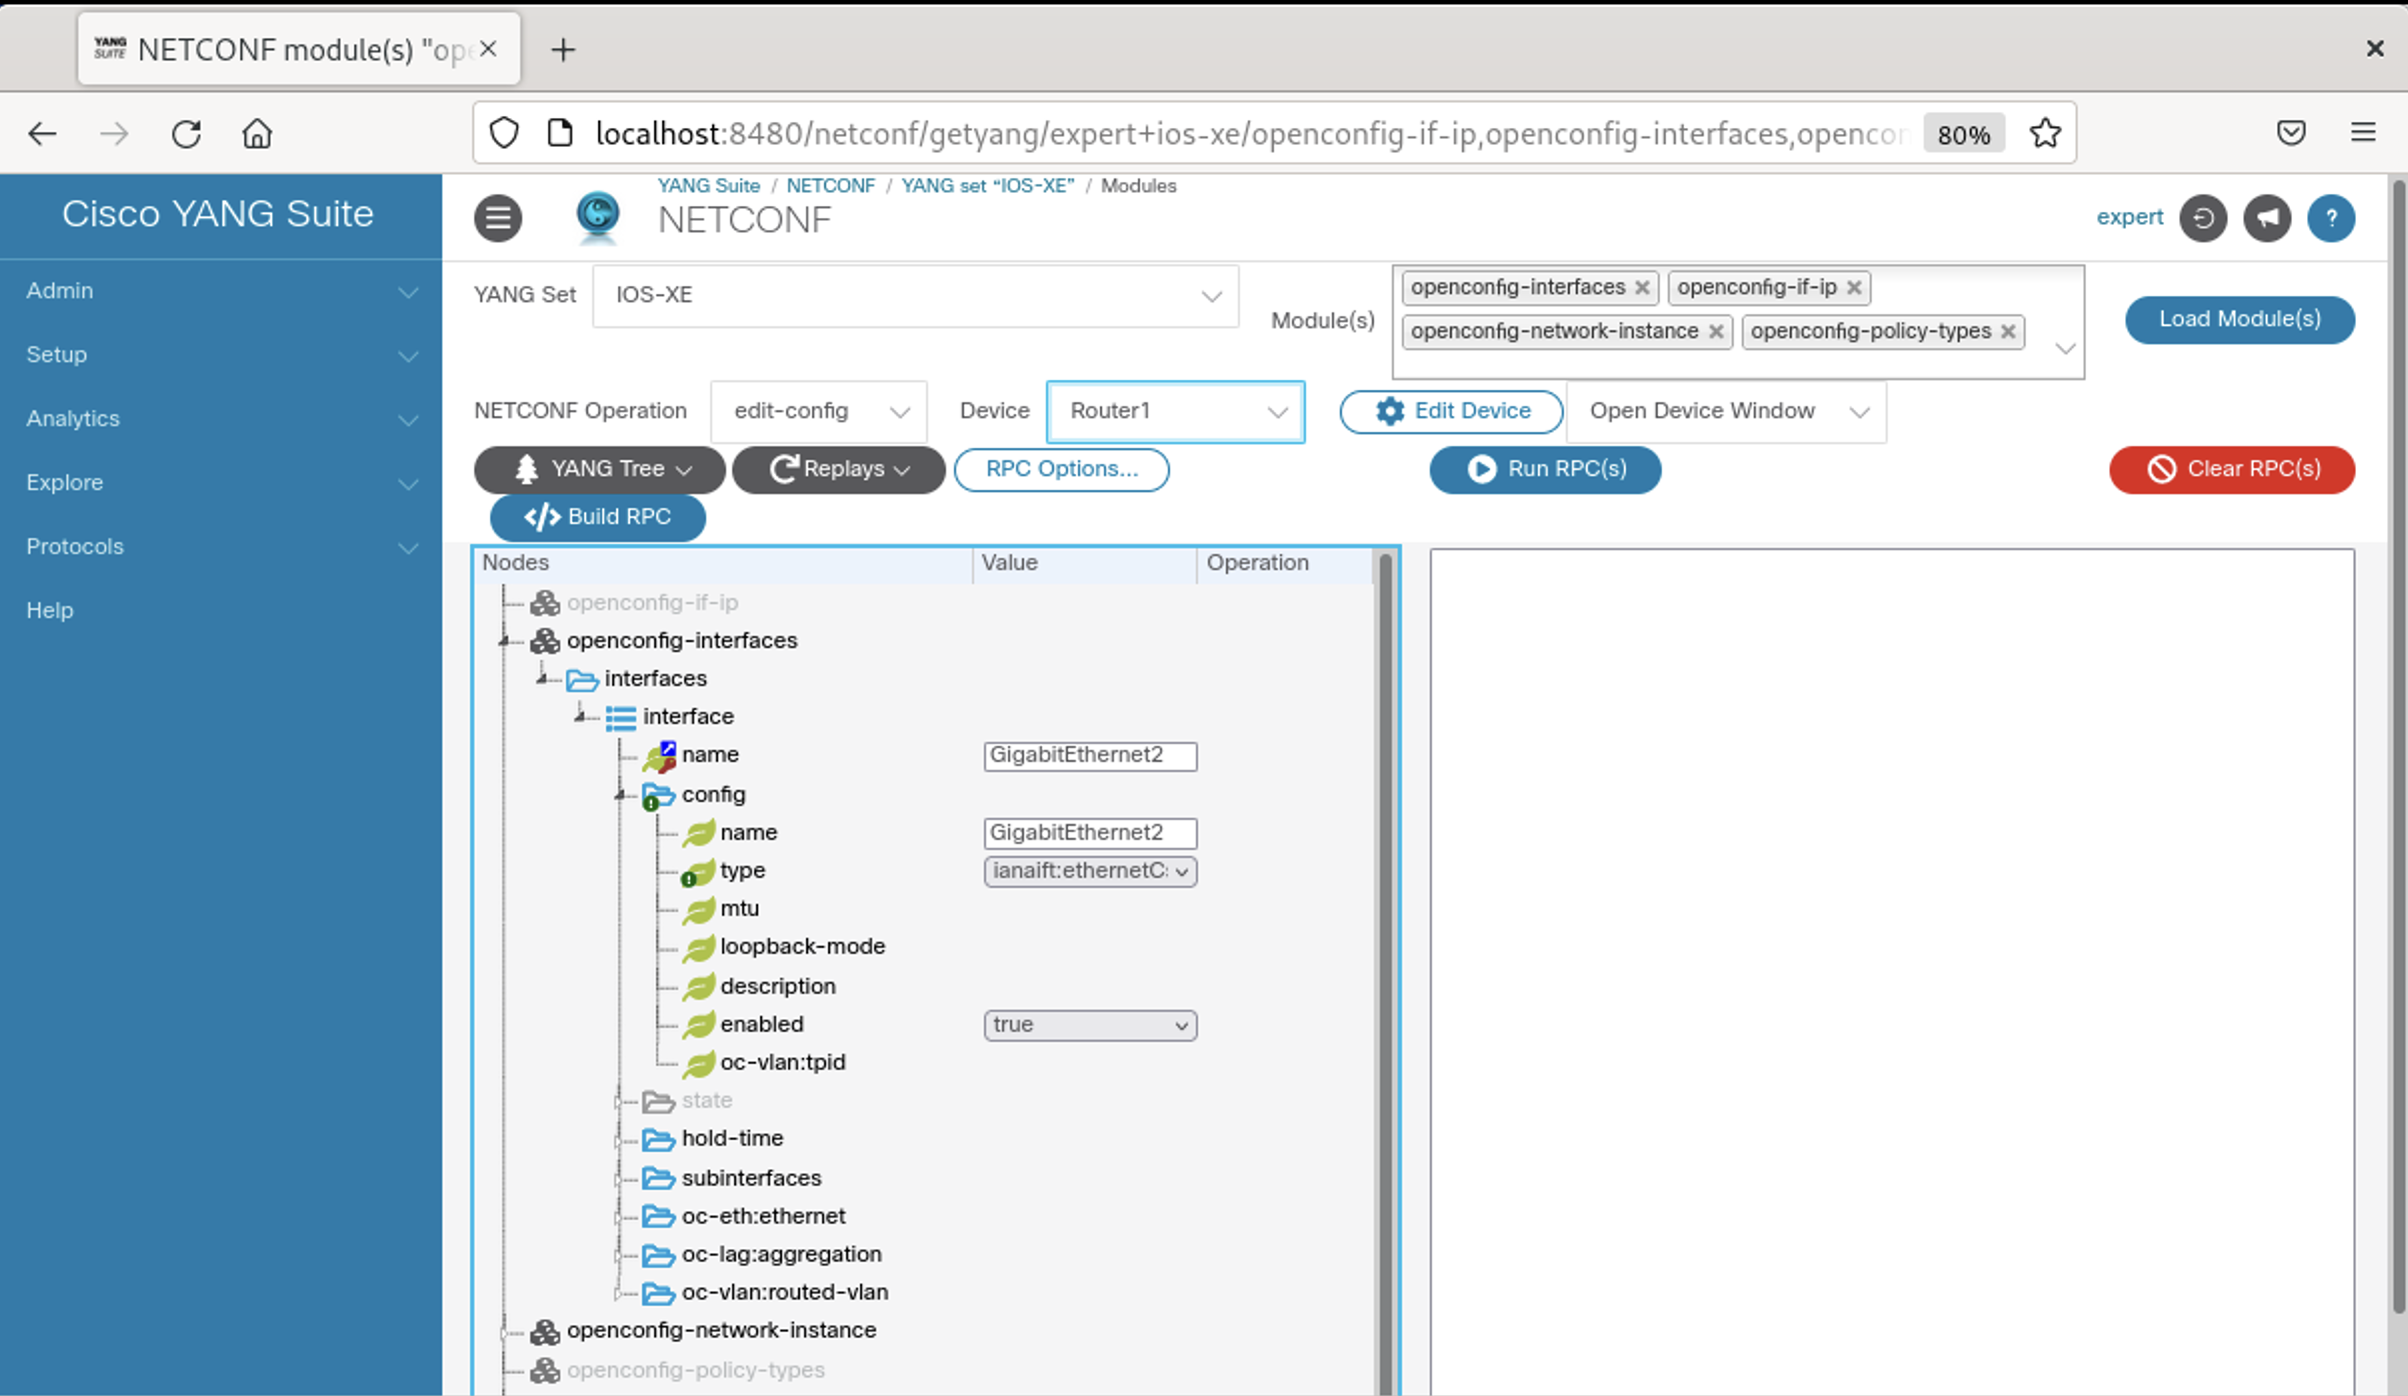 Screenshot 6: OpenConfig YANG Interfaces
The IP address configuration is a little bit hided in the OpenConfig YANG models. Scroll down to the subinterfaces container, expand it, then expand the subinterface list element. The key index needs to be 0 in the case that you do not have a subinterface which is some kind of confusing but the IP addresses need to be set there. Move on expand oc-ip:ipv4 -> oc-ip:addresses -> oc-ip:address and add 10.0.10.2 as oc-ip:ip. Expand the oc-ip:config container, add the IP address at oc-ip:ip again, and add 24 as oc-ip:prefix-length. Make sure that you have cleaned the XML payload section before you hit Build RPC(s) to take a look what we have so far.
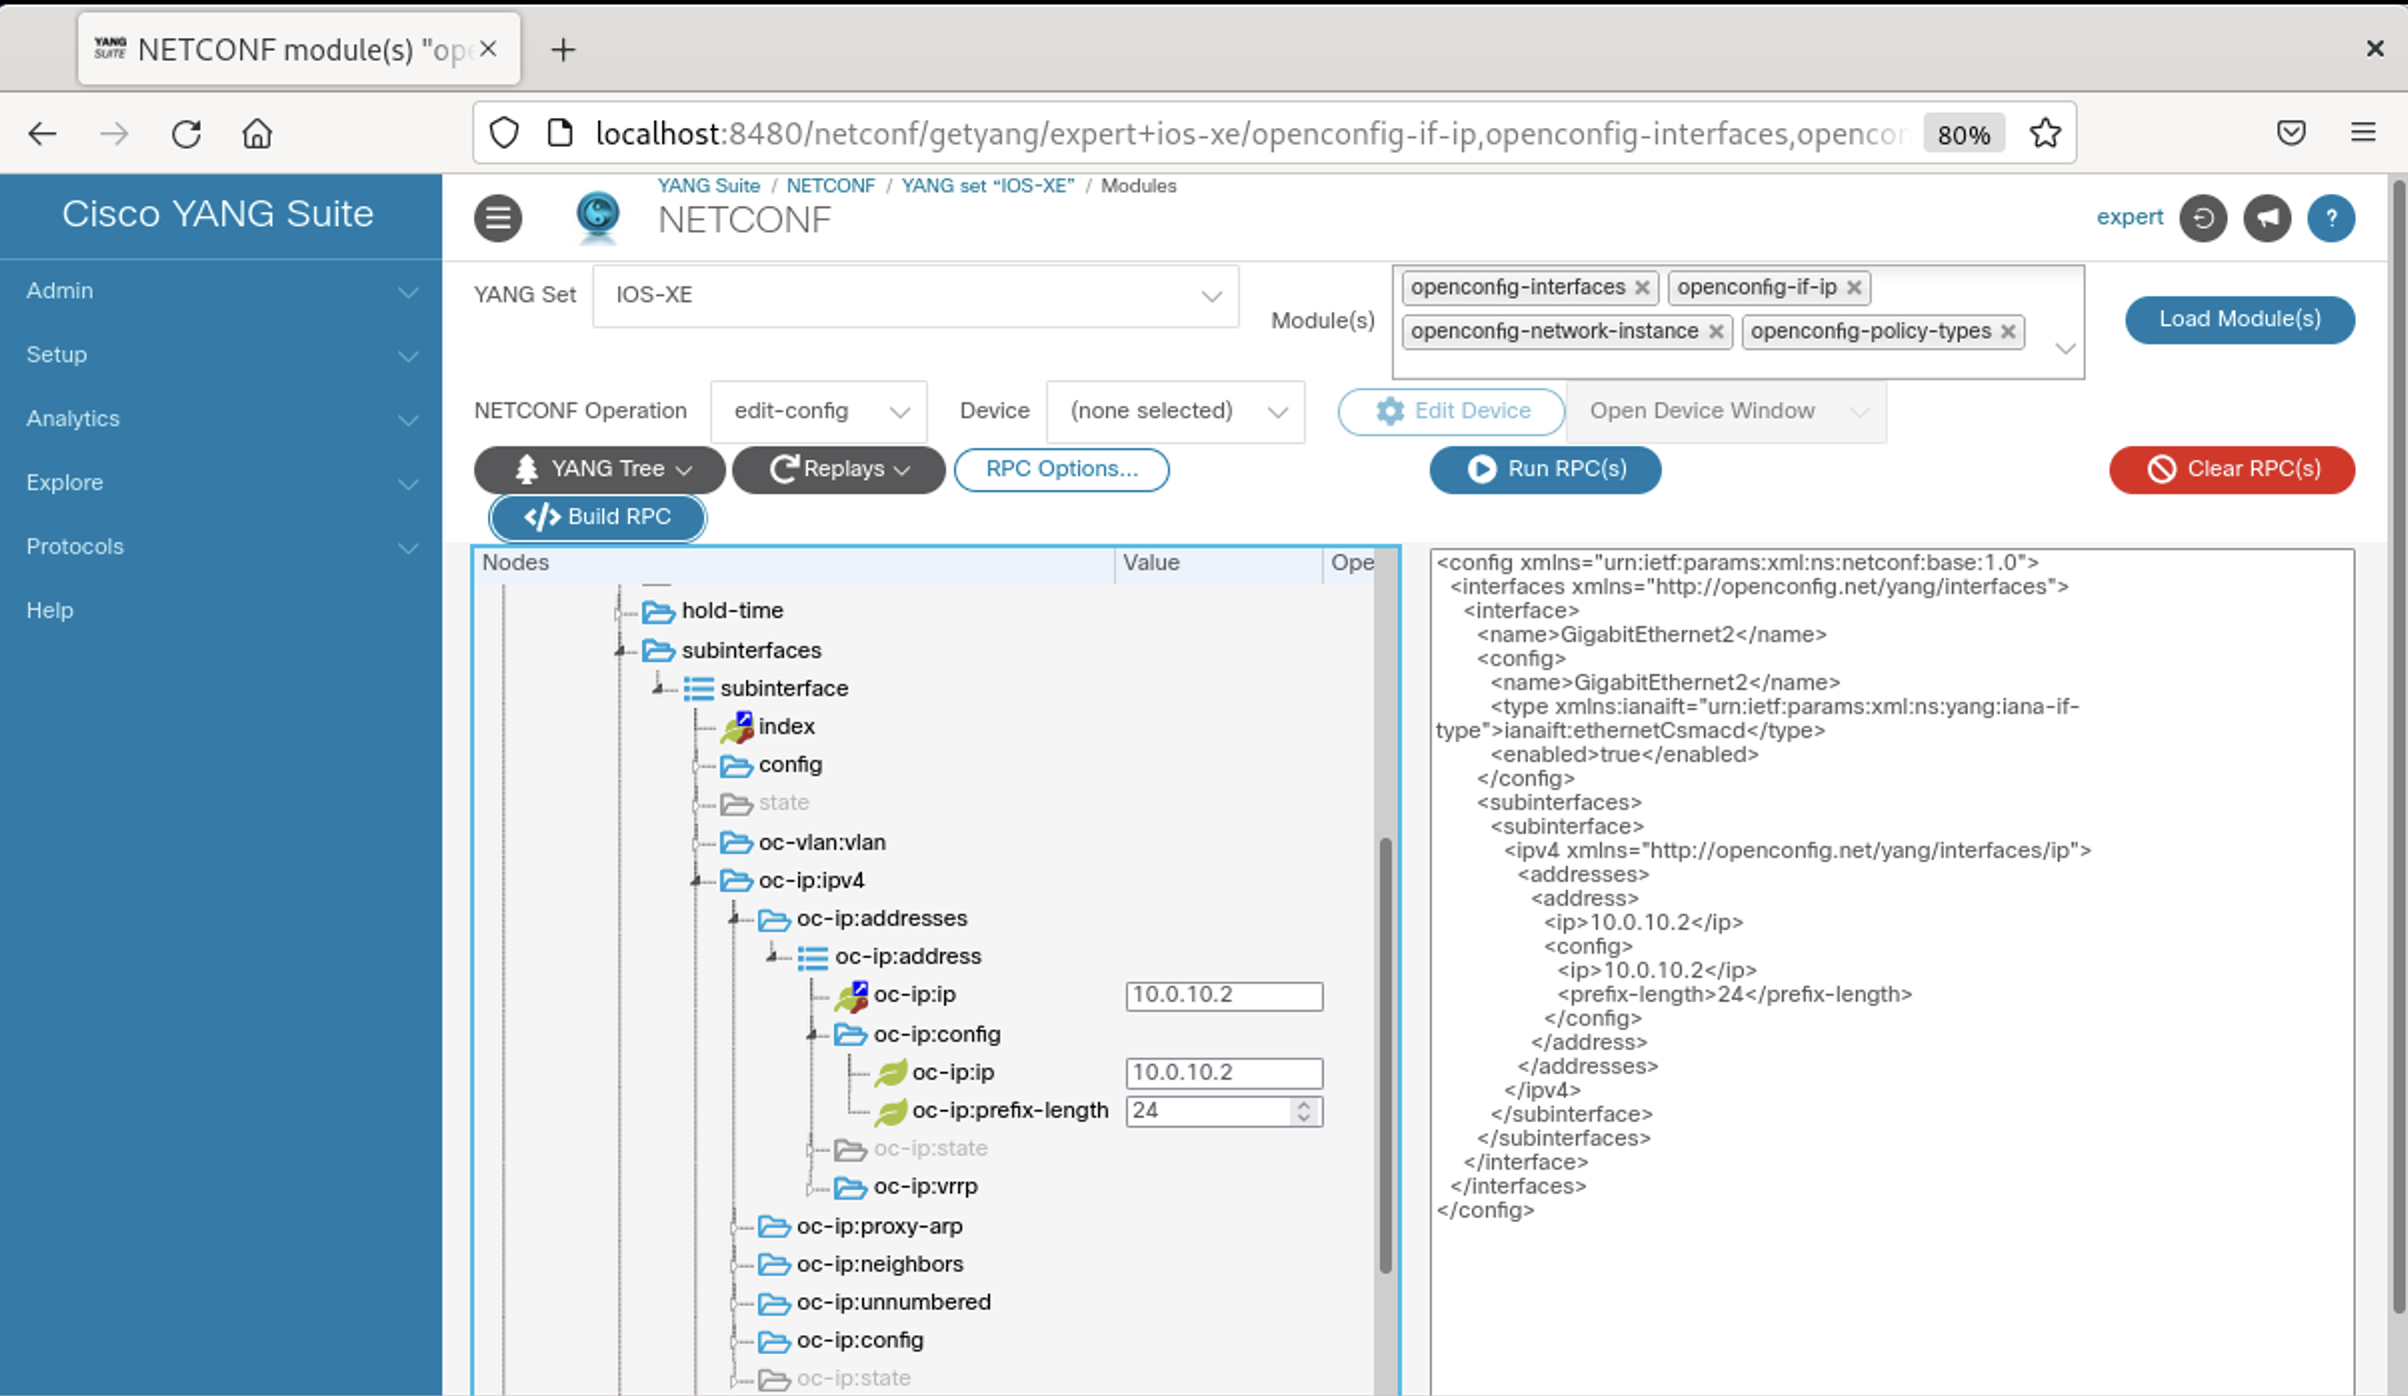 Screenshot 7: OpenConfig YANG Interfaces IP settings
Let us move to the openconfig-network-instance model to create the configuration for BGP on Router2. Expand the network-instances container and the network-instance list element. The network instances are the layer-2, layer-3, or layer-2+layer-3 forwarding instances on a NX-OS device. In our case we are using the default network instance as name which is the key of the list. As the default network instance is already present on the device we do not need to use the config container in the network-instance and can move on to the protocols container.
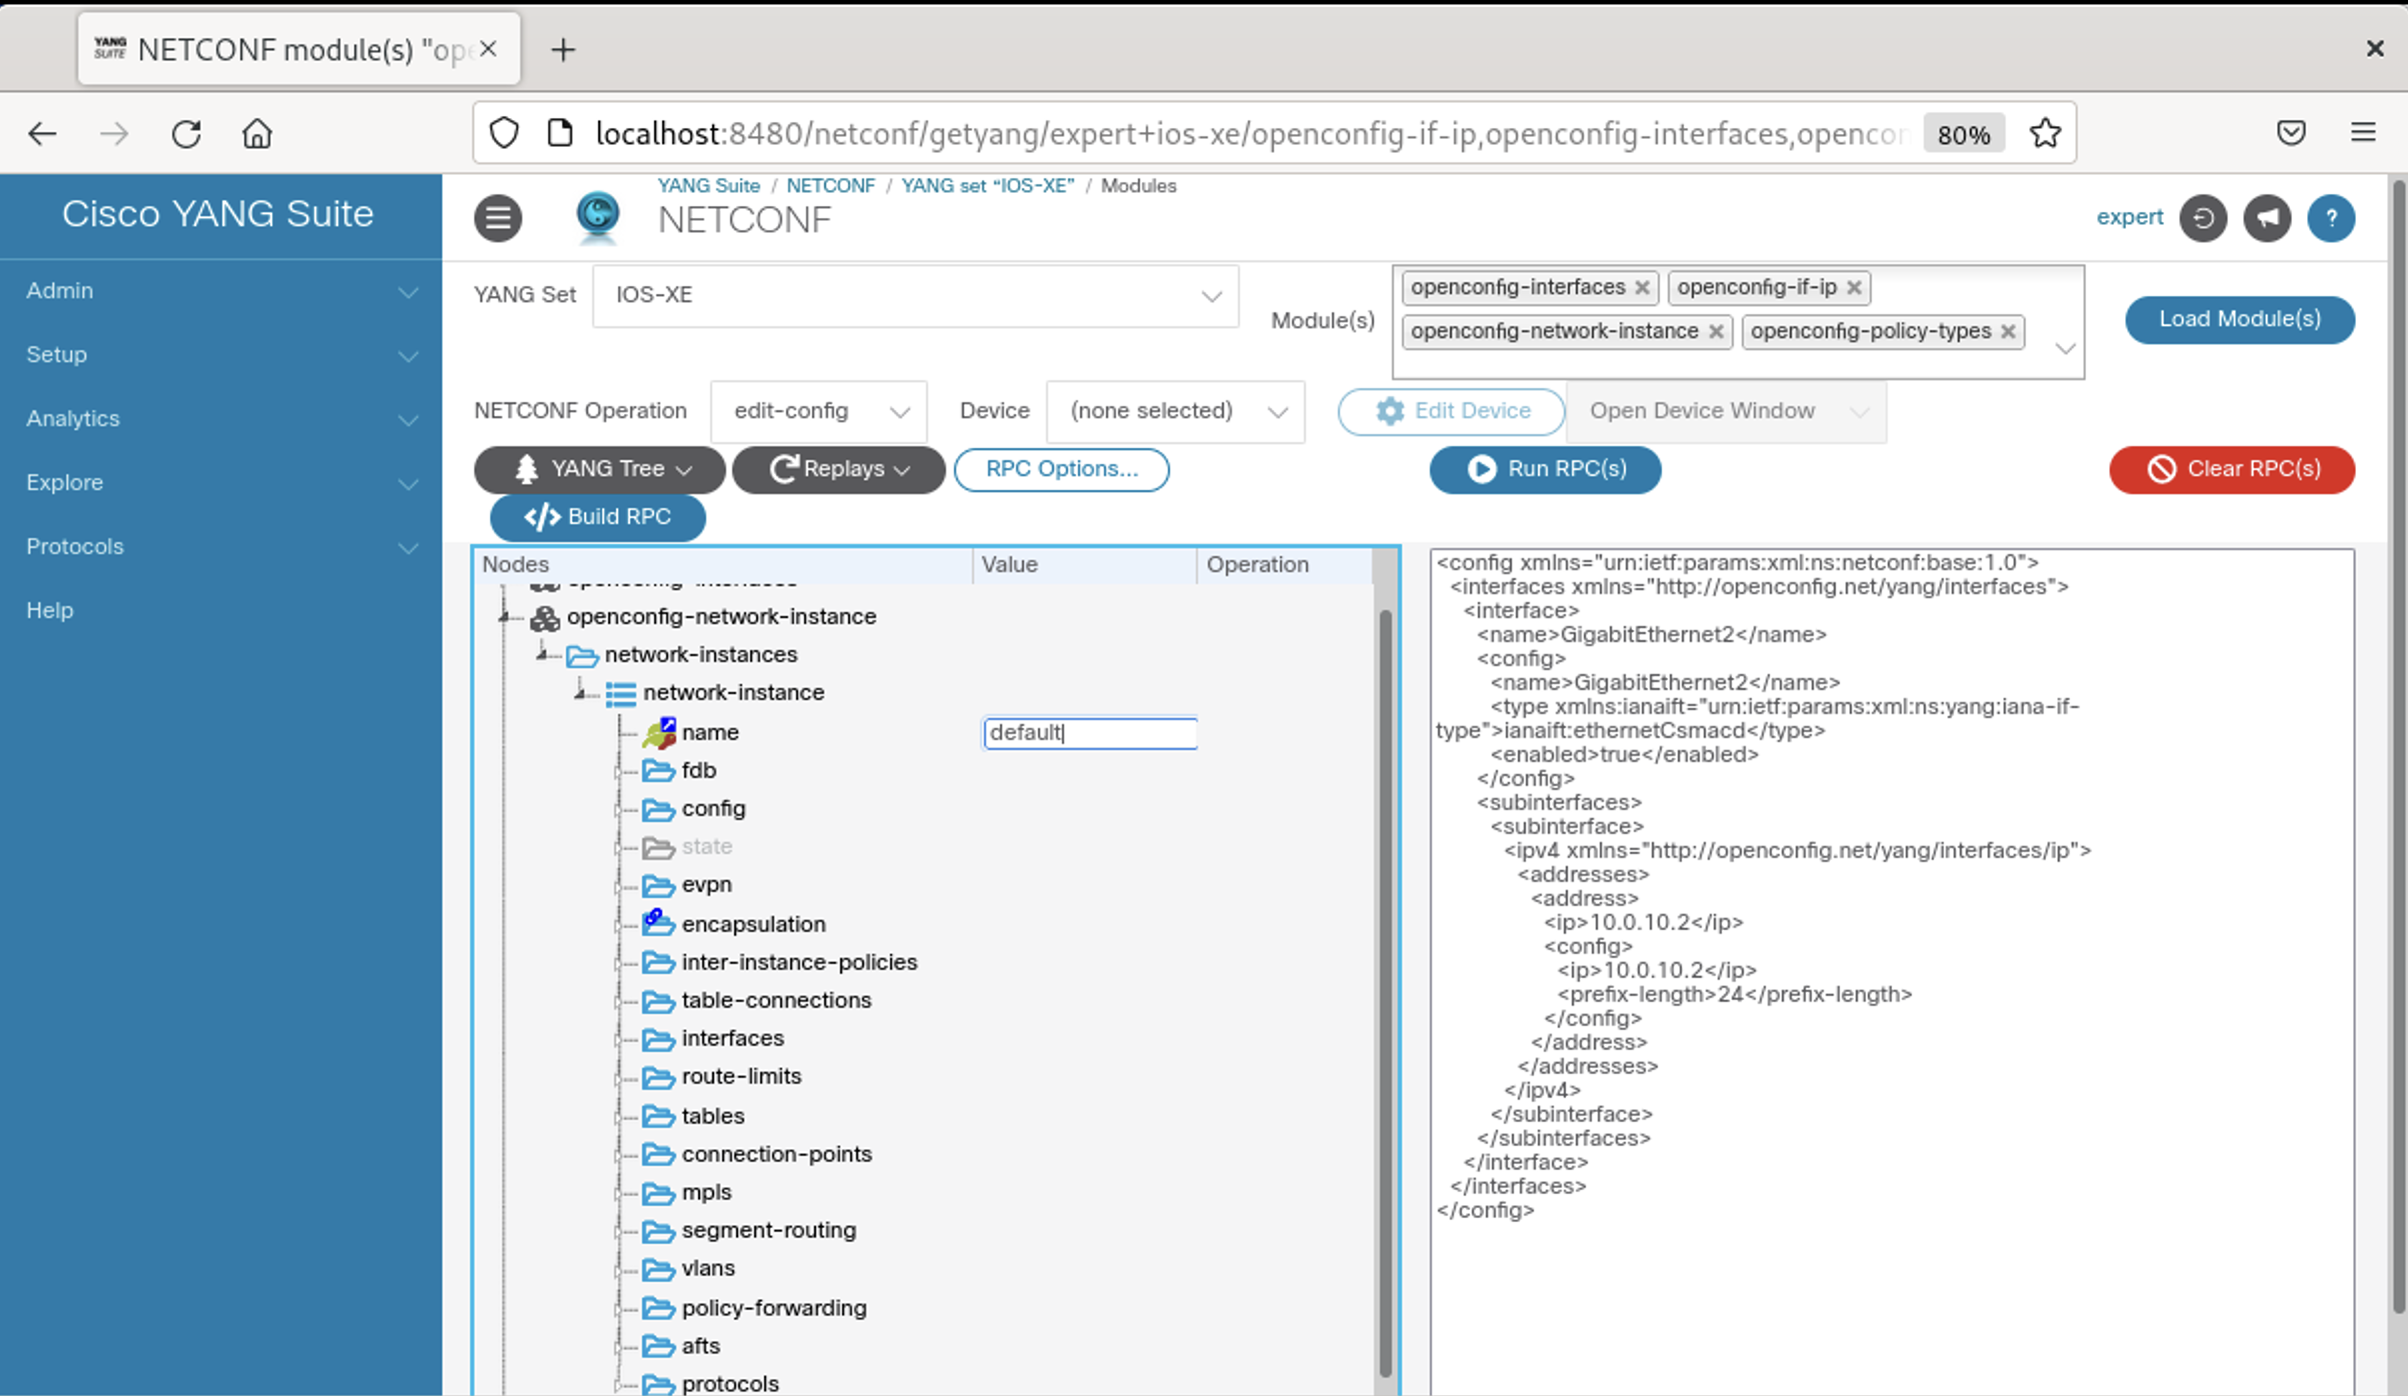 Screenshot 8: OpenConfig YANG Network Instances
Expand the protocols container and the protocol list element. Now it is getting a little bit more complicated. The identifier of the protocol needs to be added as oc-pol-types:INSTALL_PROTOCOL_TYPE which is in our case oc-pol-types:BGP. Click into the value field before and then you see that there is a reference down to the config container, expand it, and you have a drop down where you can see the valid values to choose from.
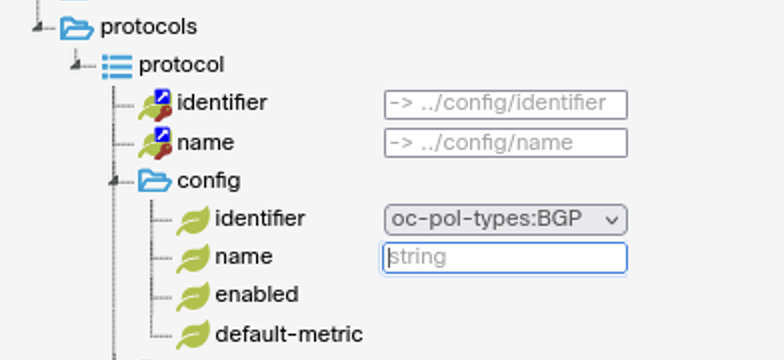 Screenshot 9: OpenConfig YANG Protocols in Network Instances
As mentioned before we use oc-pol-types:BGP as identifier in the protocol list and in the config container. We do the same with 65002 for the name which is a unique name for the protocol instance. You can add whatever string you want but for better correlation I decided to use the BGP AS number.
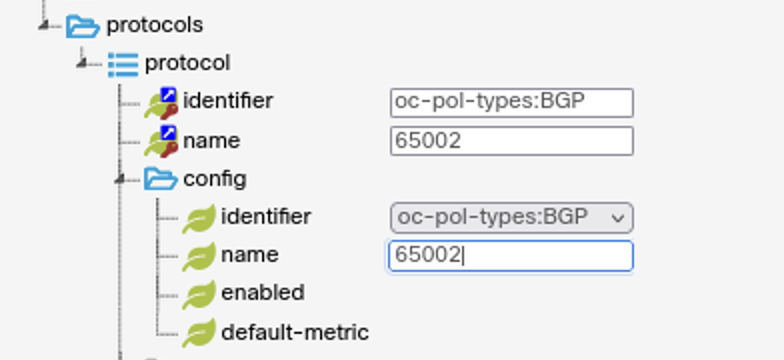 Screenshot 10: OpenConfig YANG BGP Protocol in Network Instances
Scroll further down to the bgp container and expand it. Expand the global container as well and add the as number 65002 and the router-id of 2.2.2.2. The move on to the neighbor container, expand it, and under the neighbor list element add the neighbor-address of Router1 which is 10.0.10.1. Add the same value under the config container at the neighbor-address and use 65001 as peer-as which is the equivalent of the remote-as on the neighbor statement on the CLI.
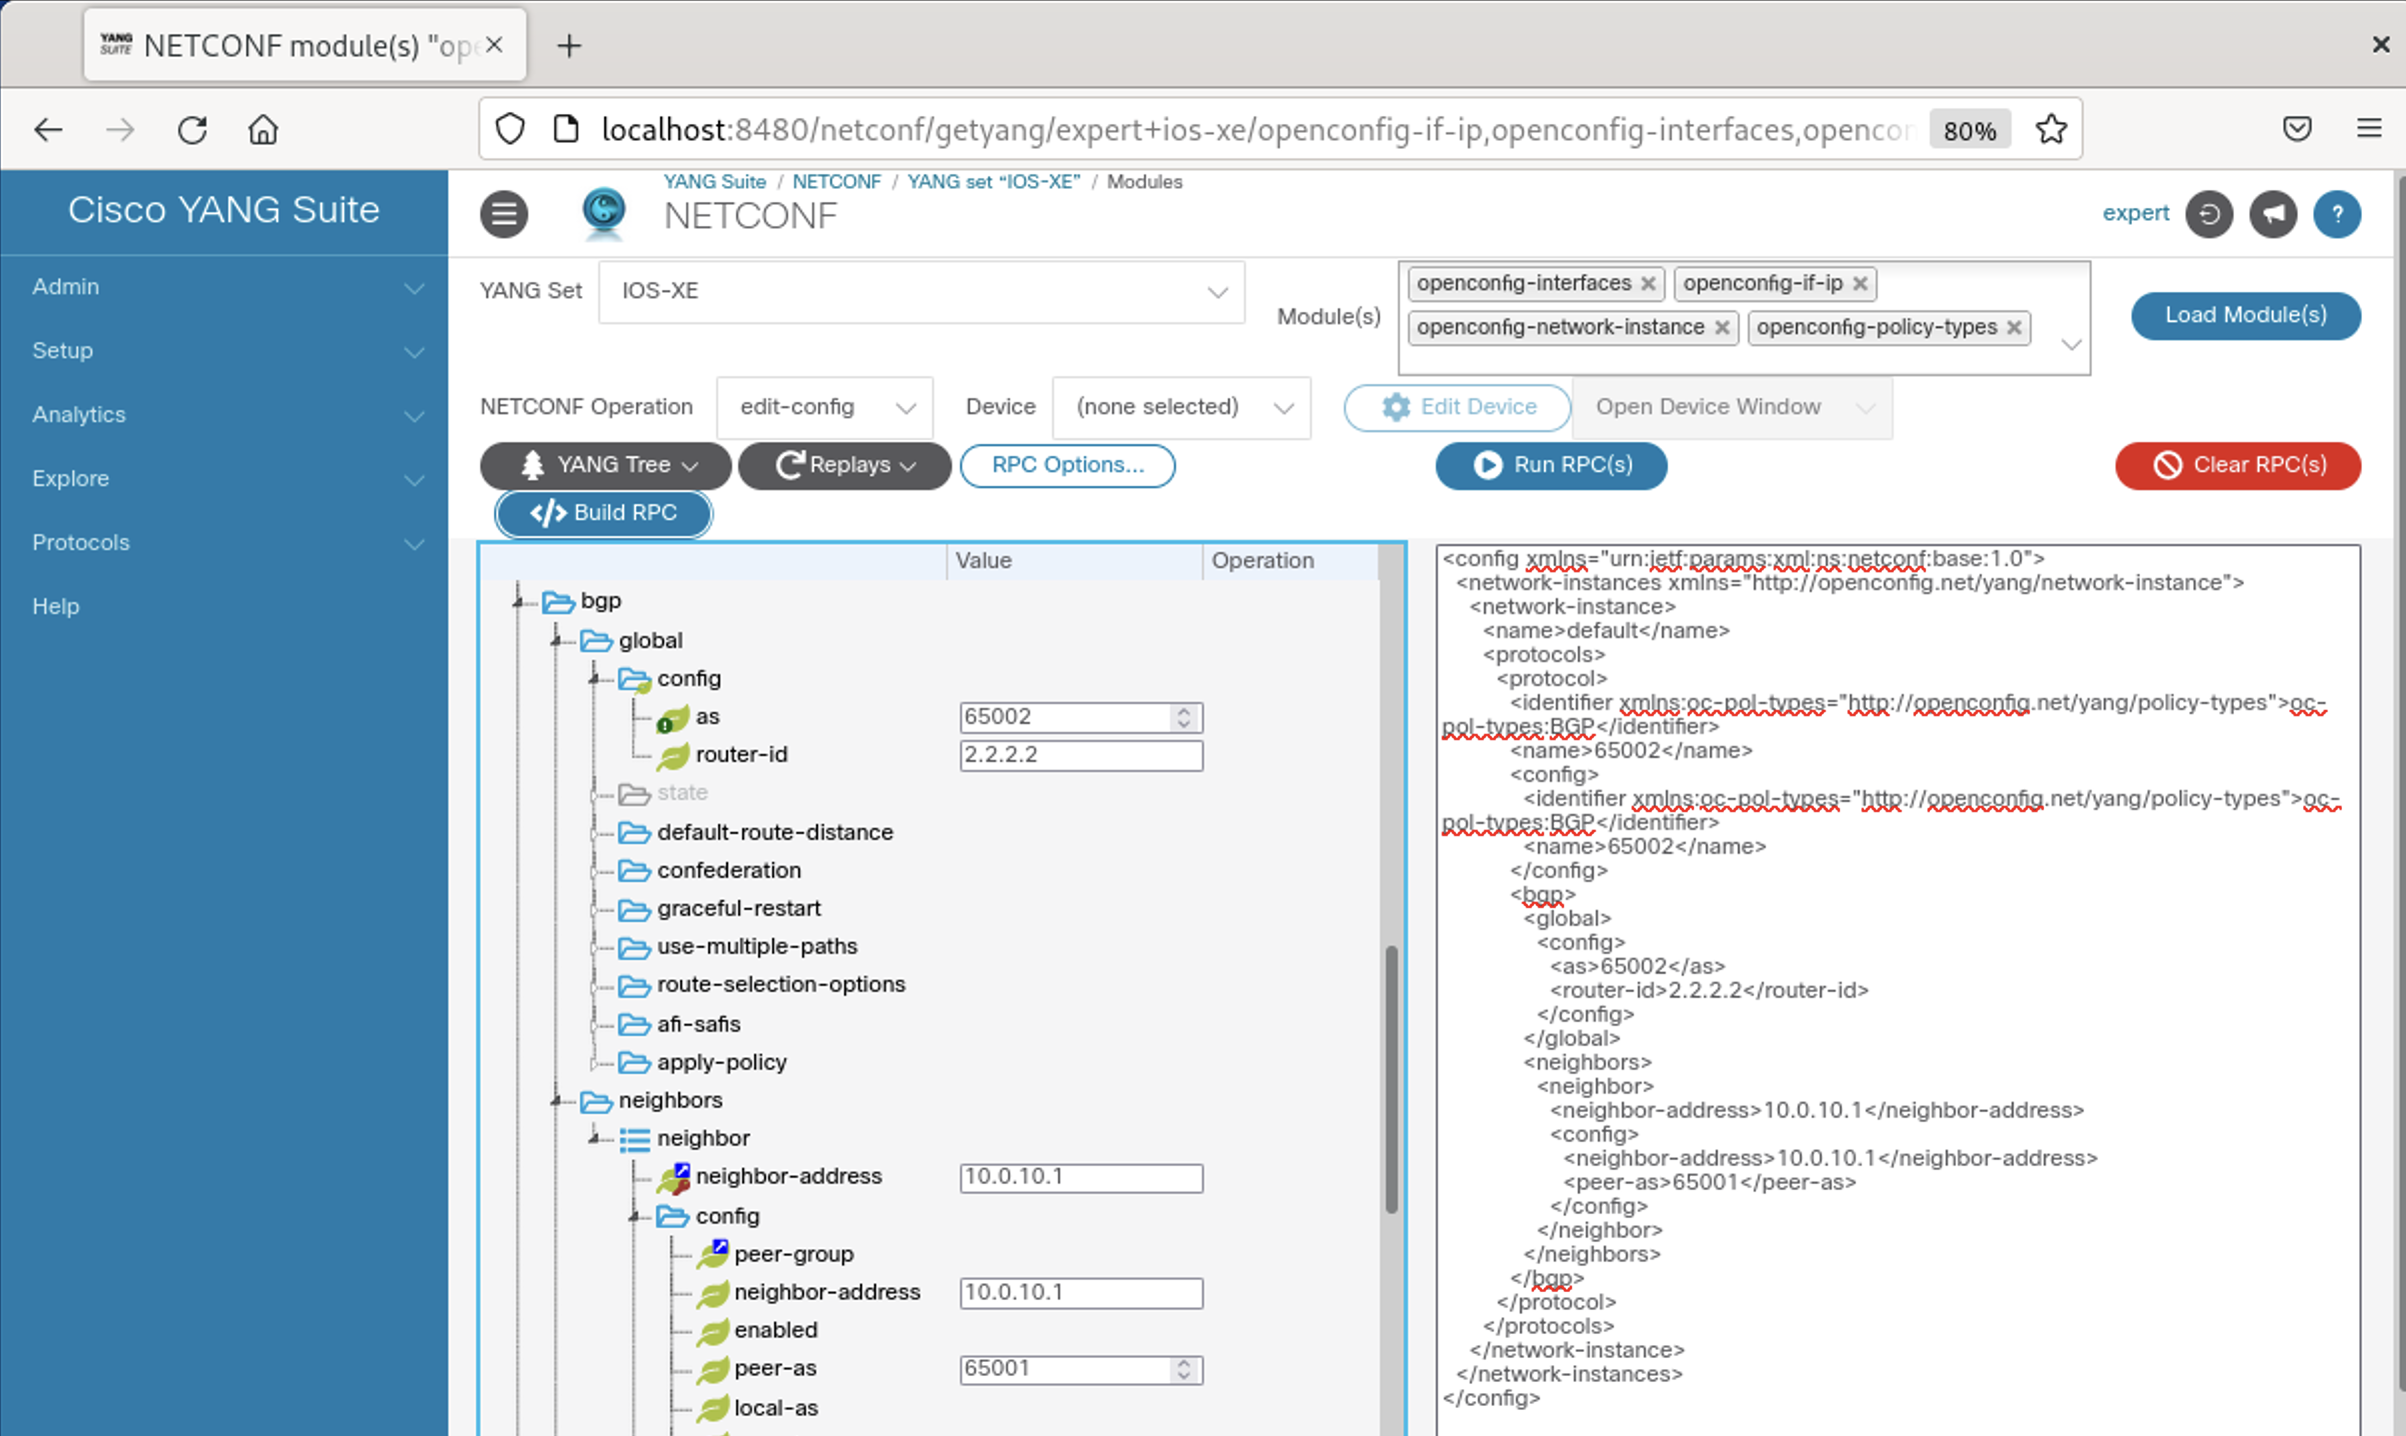 Screenshot 11: OpenConfig YANG BGP Config
Remember to clear the XML payload section using the Clear RPC(s) button and then hit Build RPC(s). Similar as we did for Router1, we are able to replicate the XML payload for the other interfaces and BGP neighbors to complete the full XML payload for Router2. It should then look like example 3 below. Now there is only the NX-OS device Nexus1 left.
<config xmlns="urn:ietf:params:xml:ns:netconf:base:1.0">
  <interfaces xmlns="http://openconfig.net/yang/interfaces">
    <interface>
      <name>GigabitEthernet2</name>
      <config>
        <name>GigabitEthernet2</name>
        <type xmlns:ianaift="urn:ietf:params:xml:ns:yang:iana-if-type">ianaift:ethernetCsmacd</type>
        <enabled>true</enabled>
      </config>
      <subinterfaces>
        <subinterface>
          <index>0</index>
          <ipv4 xmlns="http://openconfig.net/yang/interfaces/ip">
            <addresses>
              <address>
                <ip>10.0.10.2</ip>
                <config>
                  <ip>10.0.10.2</ip>
                  <prefix-length>24</prefix-length>
                </config>
              </address>
            </addresses>
          </ipv4>
        </subinterface>
      </subinterfaces>
    </interface>
    <interface>
      <name>GigabitEthernet3</name>
      <config>
        <name>GigabitEthernet3</name>
        <type xmlns:ianaift="urn:ietf:params:xml:ns:yang:iana-if-type">ianaift:ethernetCsmacd</type>
        <enabled>true</enabled>
      </config>
      <subinterfaces>
        <subinterface>
          <index>0</index>
          <ipv4 xmlns="http://openconfig.net/yang/interfaces/ip">
            <addresses>
              <address>
                <ip>10.0.20.2</ip>
                <config>
                  <ip>10.0.20.2</ip>
                  <prefix-length>24</prefix-length>
                </config>
              </address>
            </addresses>
          </ipv4>
        </subinterface>
      </subinterfaces>
    </interface>
    <interface>
      <name>GigabitEthernet4</name>
      <config>
        <name>GigabitEthernet4</name>
        <type xmlns:ianaift="urn:ietf:params:xml:ns:yang:iana-if-type">ianaift:ethernetCsmacd</type>
        <enabled>true</enabled>
      </config>
      <subinterfaces>
        <subinterface>
          <index>0</index>
          <ipv4 xmlns="http://openconfig.net/yang/interfaces/ip">
            <addresses>
              <address>
                <ip>10.0.40.2</ip>
                <config>
                  <ip>10.0.40.2</ip>
                  <prefix-length>24</prefix-length>
                </config>
              </address>
            </addresses>
          </ipv4>
        </subinterface>
      </subinterfaces>
    </interface>
  </interfaces>
  <network-instances xmlns="http://openconfig.net/yang/network-instance">
    <network-instance>
      <name>default</name>
      <protocols>
        <protocol>
          <identifier xmlns:oc-pol-types="http://openconfig.net/yang/policy-types">oc-pol-types:BGP</identifier>
          <name>65002</name>
          <config>
            <identifier xmlns:oc-pol-types="http://openconfig.net/yang/policy-types">oc-pol-types:BGP</identifier>
            <name>65002</name>
          </config>
          <bgp>
            <global>
              <config>
                <as>65002</as>
                <router-id>2.2.2.2</router-id>
              </config>
            </global>
            <neighbors>
              <neighbor>
                <neighbor-address>10.0.10.1</neighbor-address>
                <config>
                  <neighbor-address>10.0.10.1</neighbor-address>
                  <peer-as>65001</peer-as>
                </config>
              </neighbor>
              <neighbor>
                <neighbor-address>10.0.20.1</neighbor-address>
                <config>
                  <neighbor-address>10.0.20.1</neighbor-address>
                  <peer-as>65001</peer-as>
                </config>
              </neighbor>
              <neighbor>
                <neighbor-address>10.0.40.3</neighbor-address>
                <config>
                  <neighbor-address>10.0.40.3</neighbor-address>
                  <peer-as>65003</peer-as>
                </config>
              </neighbor>
            </neighbors>
          </bgp>
        </protocol>
      </protocols>
    </network-instance>
  </network-instances>
</config>
Example 3: Complete XML config payload for Router2 from OpenConfig YANG models.
Nexus1 - XML config payload using the Native + OpenConfig YANG model for NX-OS
For the NX-OS device I had several challenges during testing. Initially I wanted to use only the OpenConfig YANG modules to create the XML payload for the configuration. It quickly turned out that not all functions of the CLI were implemented in the OpenConfig YANG model for NX-OS, for example it is not possible to change an interface from a layer-2 to a layer-3 interface. On the CLI you would simply enter no switchport at the interface configuration and that’s it. So I decided to use a combination of both YANG modules, the Native Cisco-NX-OS-device module and the OpenConfig modules. Furthermore I thought it would be a good idea to keep the configuration parts separated in to single files and send it later via NETCONF sequentially to the NX-OS device.
Before being able to configure an IP address on an NX-OS interfaces we need to make it a layer-3 interface as described above. For this configuration we have to use the Native Cisco-NX-OS-device. Load the modules as we did it before and search the YANG module for the intf-items container with the phys-items sub-container. Expand the PhysIf-list list item and enter eth1/1 as key id. Scroll further down for the layer leaf and choose Layer3 from the dropdown.
 Screenshot 12: Native Cisco-NX-OS-device physical interface
Build the RPC as we did before, replicate the configuration for eth1/2**, and save the XML payload as *nxos_native_interfaces.xml file. This is the first configuration part we will send to the NX-OS device. The XML payload should look like the example 4 below.
<config xmlns="urn:ietf:params:xml:ns:netconf:base:1.0">
  <System xmlns="http://cisco.com/ns/yang/cisco-nx-os-device">
    <intf-items>
      <phys-items>
        <PhysIf-list>
          <id>eth1/1</id>
          <layer>Layer3</layer>
        </PhysIf-list>
        <PhysIf-list>
          <id>eth1/2</id>
          <layer>Layer3</layer>
        </PhysIf-list>
      </phys-items>
    </intf-items>
  </System>
</config>
Example 4: Physical interface XML config payload for Nexus1 from Native Cisco-NX-OS-device.
Then the next step is to create the configuration part for IP addressing on the interfaces. We already used the OpenConfig modules for the interface IP addressing on Router2, so we can use it as example and do not need to browse through the YANG model again and out the configuration together. Copy the XML payload for the interfaces from Router2 and replace the interfaces and IP addresses. Save the XML payload as nxos_openconfig_interfaces.xml file and it should look like example 5 below.
<config xmlns="urn:ietf:params:xml:ns:netconf:base:1.0">
  <interfaces xmlns="http://openconfig.net/yang/interfaces">
    <interface>
      <name>eth1/1</name>
      <config>
        <name>eth1/1</name>
        <type xmlns:ianaift="urn:ietf:params:xml:ns:yang:iana-if-type">ianaift:ethernetCsmacd</type>
        <enabled>true</enabled>
      </config>
      <subinterfaces>
        <subinterface>
          <index>0</index>
          <ipv4 xmlns="http://openconfig.net/yang/interfaces/ip">
            <addresses>
              <address>
                <ip>10.0.30.3</ip>
                <config>
                  <ip>10.0.30.3</ip>
                  <prefix-length>24</prefix-length>
                </config>
              </address>
            </addresses>
          </ipv4>
        </subinterface>
      </subinterfaces>
    </interface>
    <interface>
      <name>eth1/2</name>
      <config>
        <name>eth1/2</name>
        <type xmlns:ianaift="urn:ietf:params:xml:ns:yang:iana-if-type">ianaift:ethernetCsmacd</type>
        <enabled>true</enabled>
      </config>
      <subinterfaces>
        <subinterface>
          <index>0</index>
          <ipv4 xmlns="http://openconfig.net/yang/interfaces/ip">
            <addresses>
              <address>
                <ip>10.0.40.3</ip>
                <config>
                  <ip>10.0.40.3</ip>
                  <prefix-length>24</prefix-length>
                </config>
              </address>
            </addresses>
          </ipv4>
        </subinterface>
      </subinterfaces>
    </interface>
  </interfaces>
</config>
Example 5: IP addressing XML config payload for Nexus1 from OpenConfig modules.
Last but not least we create the XML payload for the BGP configuration including neighbor statements using the OpenConfig modules. As we did before we could copy the example from Router2 and use it here, but there are some differences in the NX-OS implementation of the openconfig-network-instance module compared to IOS-XE. The first thing is the name leaf at the protocol list element under the protocols container. In the NX-OS implementation it has to match the protocol name you want to use, in our case bgp. The second thing is the address family specific configuration per neighbor at the afi-safis container under the neighbor list element which needs to be added on NX-OS. We have to add oc-bgp-types:IPv4_UNICAST as afi-safi-name key and under the config container for each neighbor statement. Example 6 shows you the complete BGP XML payload.
<config>
  <network-instances xmlns="http://openconfig.net/yang/network-instance">
    <network-instance>
      <name>default</name>
      <protocols>
        <protocol>
          <name>bgp</name>
          <identifier xmlns:oc-pol-types="http://openconfig.net/yang/policy-types">oc-pol-types:BGP</identifier>
          <config>
            <identifier xmlns:oc-pol-types="http://openconfig.net/yang/policy-types">oc-pol-types:BGP</identifier>
            <name>bgp</name>
          </config>
          <bgp>
            <global>
              <config>
                <as>65003</as>
                <router-id>3.3.3.3</router-id>
              </config>
            </global>
            <neighbors>
              <neighbor>
                <neighbor-address>10.0.30.1</neighbor-address>
                <config>
                  <neighbor-address>10.0.30.1</neighbor-address>
                  <peer-as>65001</peer-as>
                </config>
                <afi-safis>
                  <afi-safi>
                    <afi-safi-name xmlns:oc-bgp-types="http://openconfig.net/yang/bgp-types">oc-bgp-types:IPV4_UNICAST</afi-safi-name>
                    <config>
                      <afi-safi-name xmlns:oc-bgp-types="http://openconfig.net/yang/bgp-types">oc-bgp-types:IPV4_UNICAST</afi-safi-name>
                    </config>
                  </afi-safi>
                </afi-safis>
              </neighbor>
              <neighbor>
                <neighbor-address>10.0.40.2</neighbor-address>
                <config>
                  <neighbor-address>10.0.40.2</neighbor-address>
                  <peer-as>65002</peer-as>
                </config>
                <afi-safis>
                  <afi-safi>
                    <afi-safi-name xmlns:oc-bgp-types="http://openconfig.net/yang/bgp-types">oc-bgp-types:IPV4_UNICAST</afi-safi-name>
                    <config>
                      <afi-safi-name xmlns:oc-bgp-types="http://openconfig.net/yang/bgp-types">oc-bgp-types:IPV4_UNICAST</afi-safi-name>
                    </config>
                  </afi-safi>
                </afi-safis>
              </neighbor>
            </neighbors>
          </bgp>
        </protocol>
      </protocols>
    </network-instance>
  </network-instances>
</config>
Example 6: BGP XML config payload for Nexus1 from OpenConfig modules.
Pushing the XML payload configs using ncclient
Now we are ready tp push the XML payload configurations using the Python library ncclient. I have prepared a script for this which loops through the list of devices, opens the XML payload for the configuration, and sends it to the device using NETCONF with the <edit-config> operation. There is a list of configurations for the NX-OS device Nexus1 which will be used in an additional loop and sends all three XML payloads sequentially to the device. Should be pretty straight forward as you can see in example 7 below.
'''Python script to push XML configuration payload to devices via NETCONF'''
import logging
from ncclient import manager

logging.basicConfig(level=logging.DEBUG)

# List of devices IOSXE devices
devices = ["192.168.255.51", "192.168.255.52", "192.168.255.53"]

# List of NX-OS device configurations
nxos_configs = ["native_interfaces", "openconfig_interfaces", "openconfig_bgp"]

# Loop through the devices and connect to it
for device in devices:
    router = manager.connect(
        host=device,
        username="expert",
        password="1234QWer!",
        hostkey_verify=False
        )

    # For the NX-OS device
    if device == "192.168.255.53":
        # Loop through the NXOS configs and apply it
        for config in nxos_configs:
            with open(f"nxos_{config}.xml", encoding="utf-8") as file:
                payload = file.read()
            router.edit_config(payload, target="running")
    # For all other devices
    else:
        with open(f"{device}.xml", encoding="utf-8") as file:
            payload = file.read()
        router.edit_config(payload, target="running")
Example 7: Python script to send the configuration to the devices.
Verification & Validation
As you might saw I imported the logging module and sat the logging level to DEBUG with logging.basicConfig(level=logging.DEBUG). It could be commented in the code but for troubleshooting it is very helpful. Below in example 8 there is an error message from the debug messages which shows you exactly what was wrong with your XML payload.
<rpc-reply xmlns="urn:ietf:params:xml:ns:netconf:base:1.0" message-id="urn:uuid:a3bdb31a-db79-46f1-9d6e-c915b94777a8">
    <rpc-error>
        <error-type>protocol</error-type>
        <error-tag>invalid-value</error-tag>
        <error-severity>error</error-severity>
        <error-message xml:lang="en">List Merge Failed: [ERR] Invalid DN sys/isis/inst, wrong rn prefix inst at position 13</error-message>
        <error-path>/network-instances/network-instance/protocols/protocol/name</error-path>
    </rpc-error>
</rpc-reply>
Example 8: NETCONF RPC reply error message.
Not every time are the error messages that helpful and you have to dig into the YANG models to find out what was wrong. I can tell you that I went through a lot of trial & error testing phases. In our case everything went well and we got an <ok/> message back from the devices which looks like the one in example 9.
<?xml version="1.0" encoding="UTF-8"?>
<rpc-reply xmlns="urn:ietf:params:xml:ns:netconf:base:1.0" message-id="urn:uuid:42aeb554-42a7-4dc6-abb3-47776dc9e635">
    <ok/>
</rpc-reply>
Example 9: NETCONF RPC reply ok message.
Now there is only one thing left which is the validation of our changes. We know that the NETCONF operations via the Python script using ncclient went well but is the configuration working on the devices? We could login to the device and quickly check it manually, but we could also use YANG Suite to validate our changes. Let me show you how it works for IOS-XE for example. Load the Native Cisco-IOS-XE-bgp-oper model and choose the <get> operation with the Router1 as device. Expand the bgp-state-data container and the neighbors container. Mark the checkbox at the neighbor list and click into the value field of the neighbor-id wihtout entering anything. Then build the XML payload using the Build RPC(s) button and run it with Run RPC(s).
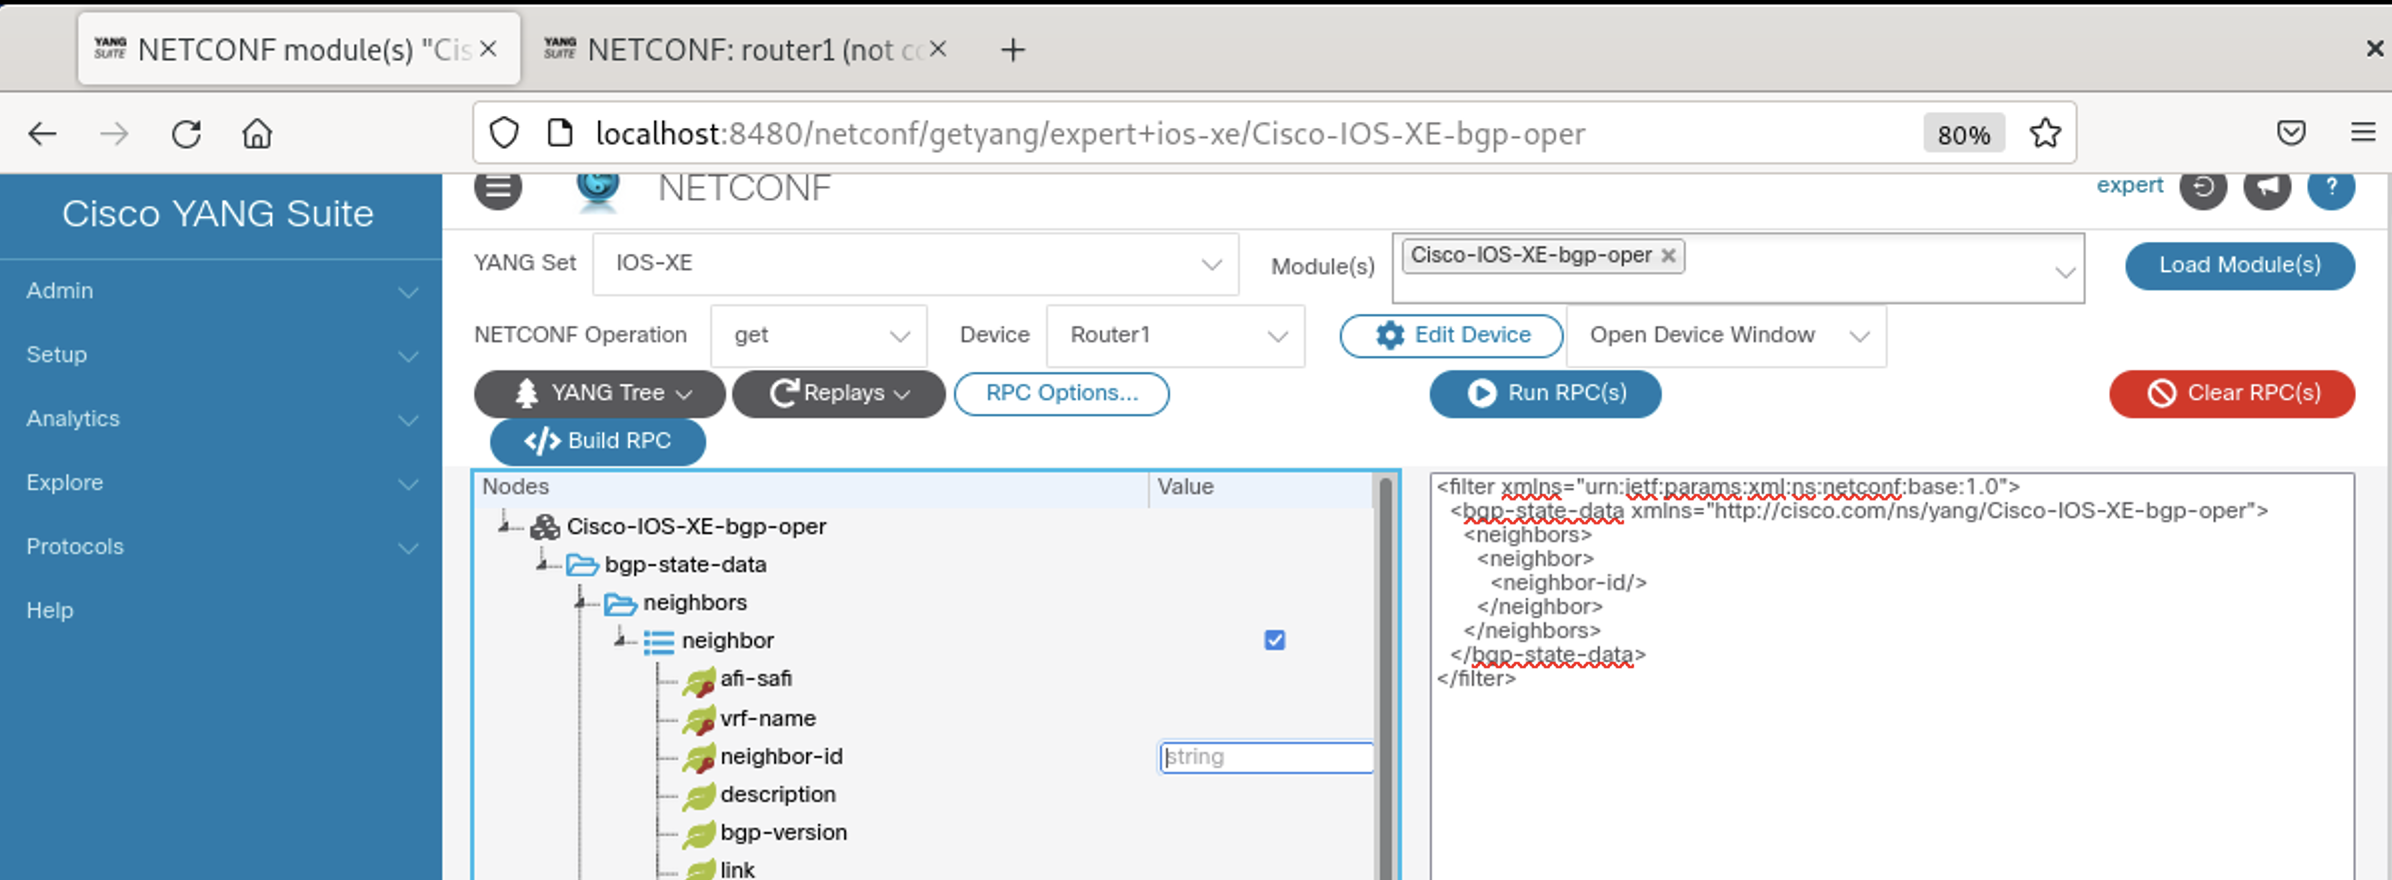 Screenshot 13: BGP neighbor validation using Cisco-IOS-XE-bgp-oper model
A new browser tab will be opened where you can follow the complete RPC with all details similar to the debug from the Python script. You can see the successful RPC reply message showing the neighbors from Router1.
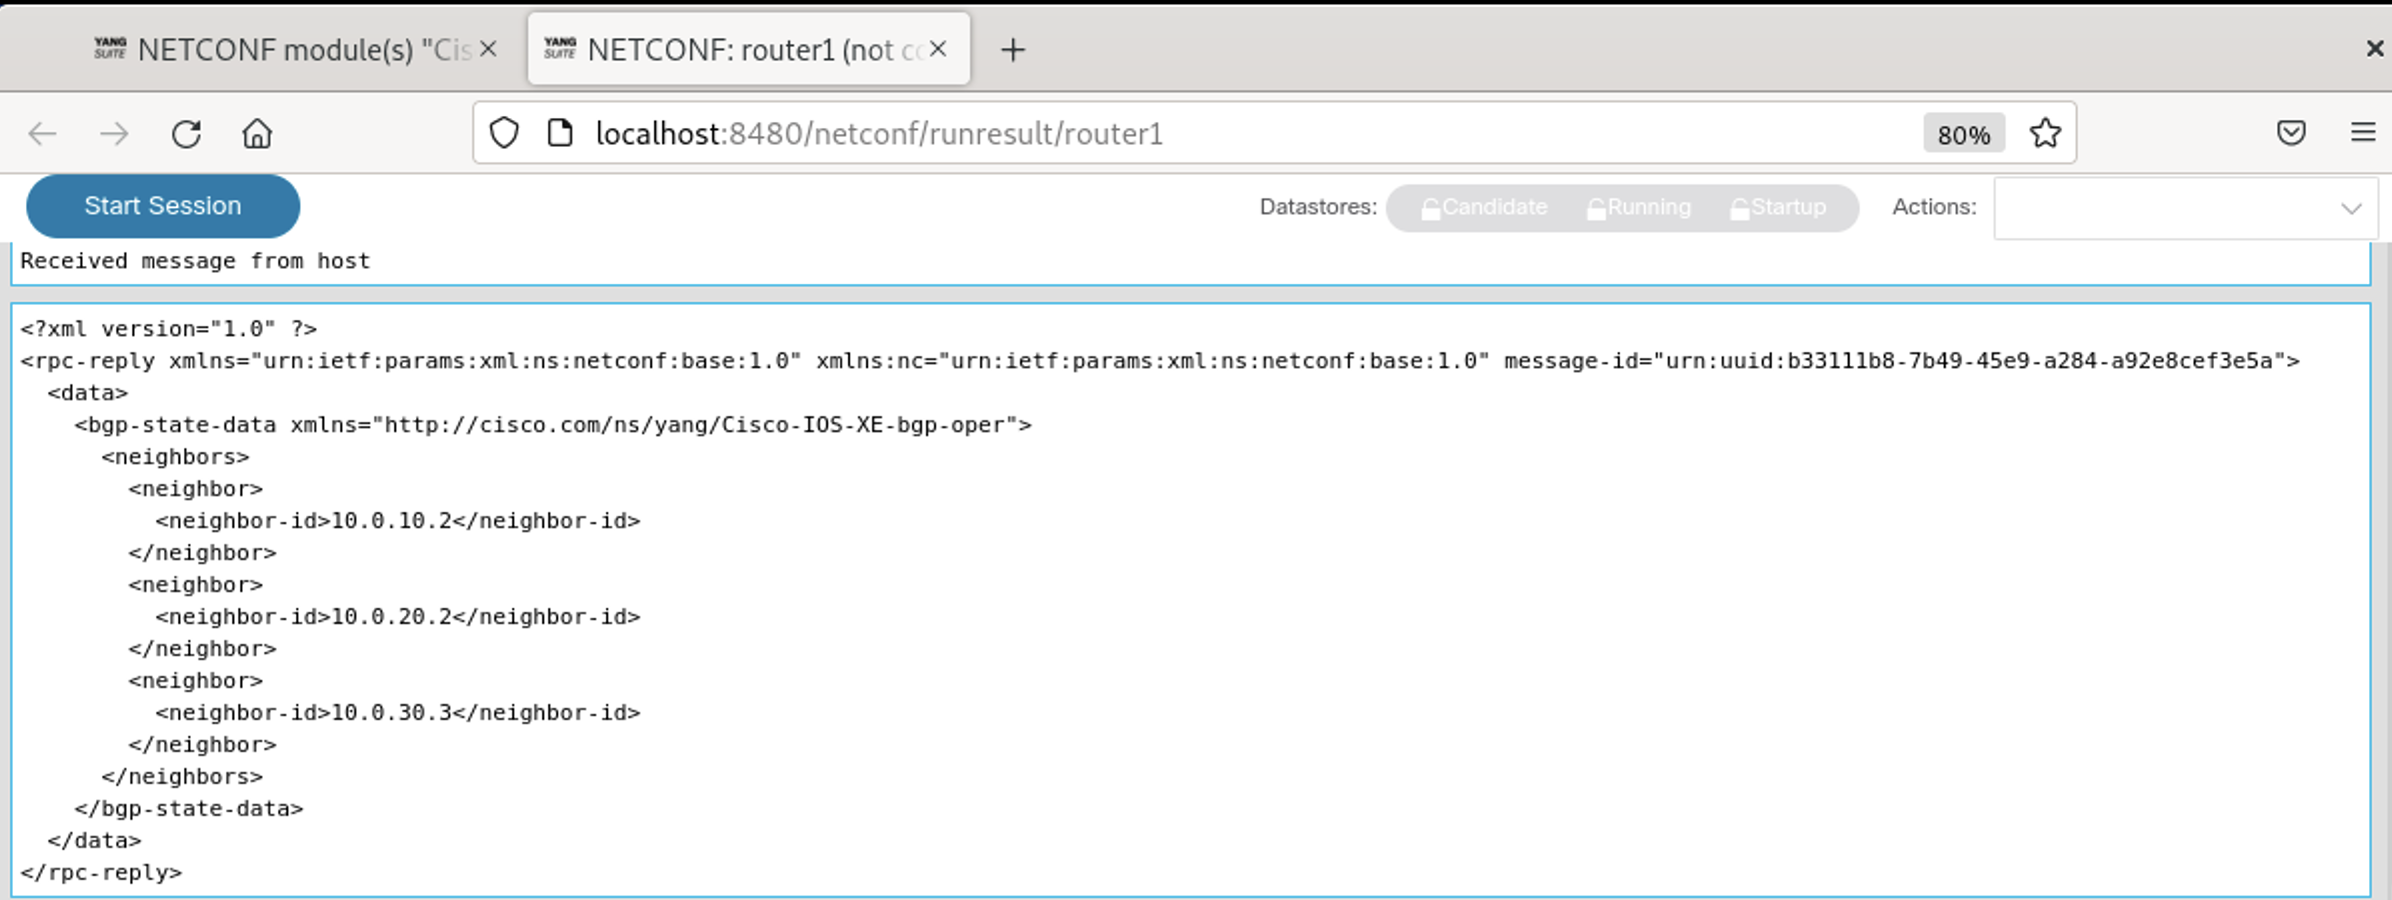 Screenshot 14: BGP neighbor validation reply message.
For the OpenConfig YANG models there are no operation models like for the Native models and you need to use the same models as for the configuration parts, but then for the state data. Load the OpenConfig openconfig-network-instance model, but leave the <get> operation and Router1 as device. Add the default value to the name leaf of the network-instance container and then move further down to the protocol list element under the protocols container. Expand the bgp and neighbors containers, mark the neighbor list element and click into the neighbor-address field without adding anything. Expand the state container and click into the neighbor-address value field also without adding anything.
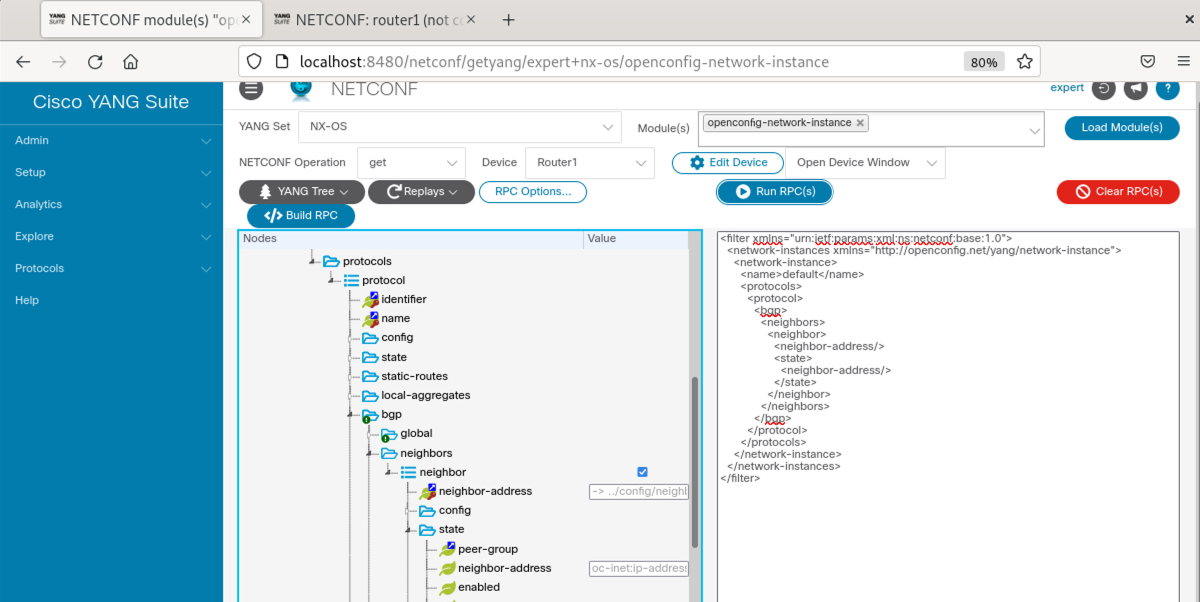 Screenshot 15: BGP neighbor validation using OpenConfig model
Clear the XML payload section using Clear RPC(s) again and create a new RPC using the Build RPC(s) button and it should look like the screenshot 15 above. Run the RPC with Run RPC(s) and you should get the same RPC reply message from Router1 as show in screenshot 16. The results are the same, but this time with the OpenConfig YANG model.
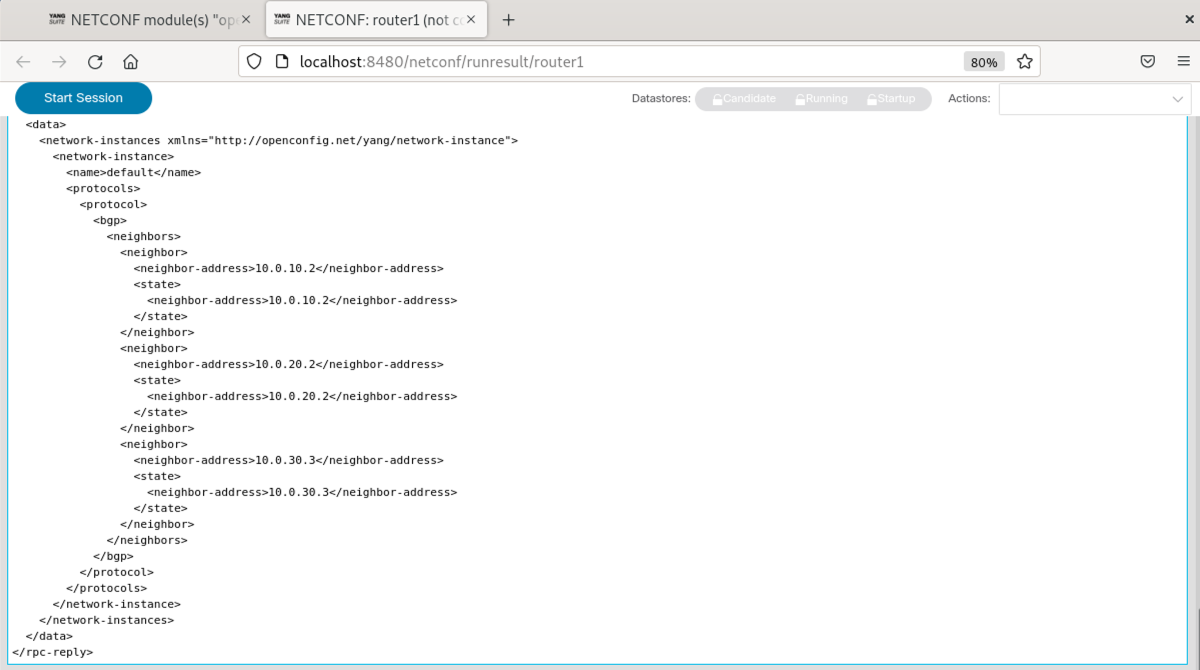 Screenshot 16: BGP neighbor validation reply message with OpenConfig.
The next steps could be to build another Python script using NETCONF with the <get> operation to validate the changes in a programmatic way, but this is something for the another blog post.
I hope it was easy to follow and to replicate on your own setup. You can find all files from the examples used in this post in my GitHub repository netconf-example. If you face into any issues with the setup or if you found any errors please let me know and/or leave a comment using the Github issues.
Thank you for reading this blog post and following along until the end. Please leave a feedback in the comments!
Comments
Post comment