Validate Configs using NETCONF + YANG
In my previous blog post NETCONF XML Payload with YANG models I explained how to create proper XML payload using the Native and the OpenConfig YANG models for IOS-XE and NX-OS to send configuration data to the devices with NETCONF. I wrote that the next steps could be building another Python script using NETCONF with the <get> operation to validate the changes I made in a programmatic way. Here we are!
I will show you the following two different options for the config validation:
✅ IOS-XE config validation with Native YANG model
✅ NX-OS config validation with OpenConfig YANG model
Let’s recap first what I did in the previous blog post. For the initial lab setup please refer to my DevNet Expert Lab on Cisco Modeling Labs GitHub repository. Then I did the configuration changes described at the previous blog post NETCONF XML Payload with YANG models. In short I configured the interfaces with IP addressing and the BGP configuration described on the diagram below.
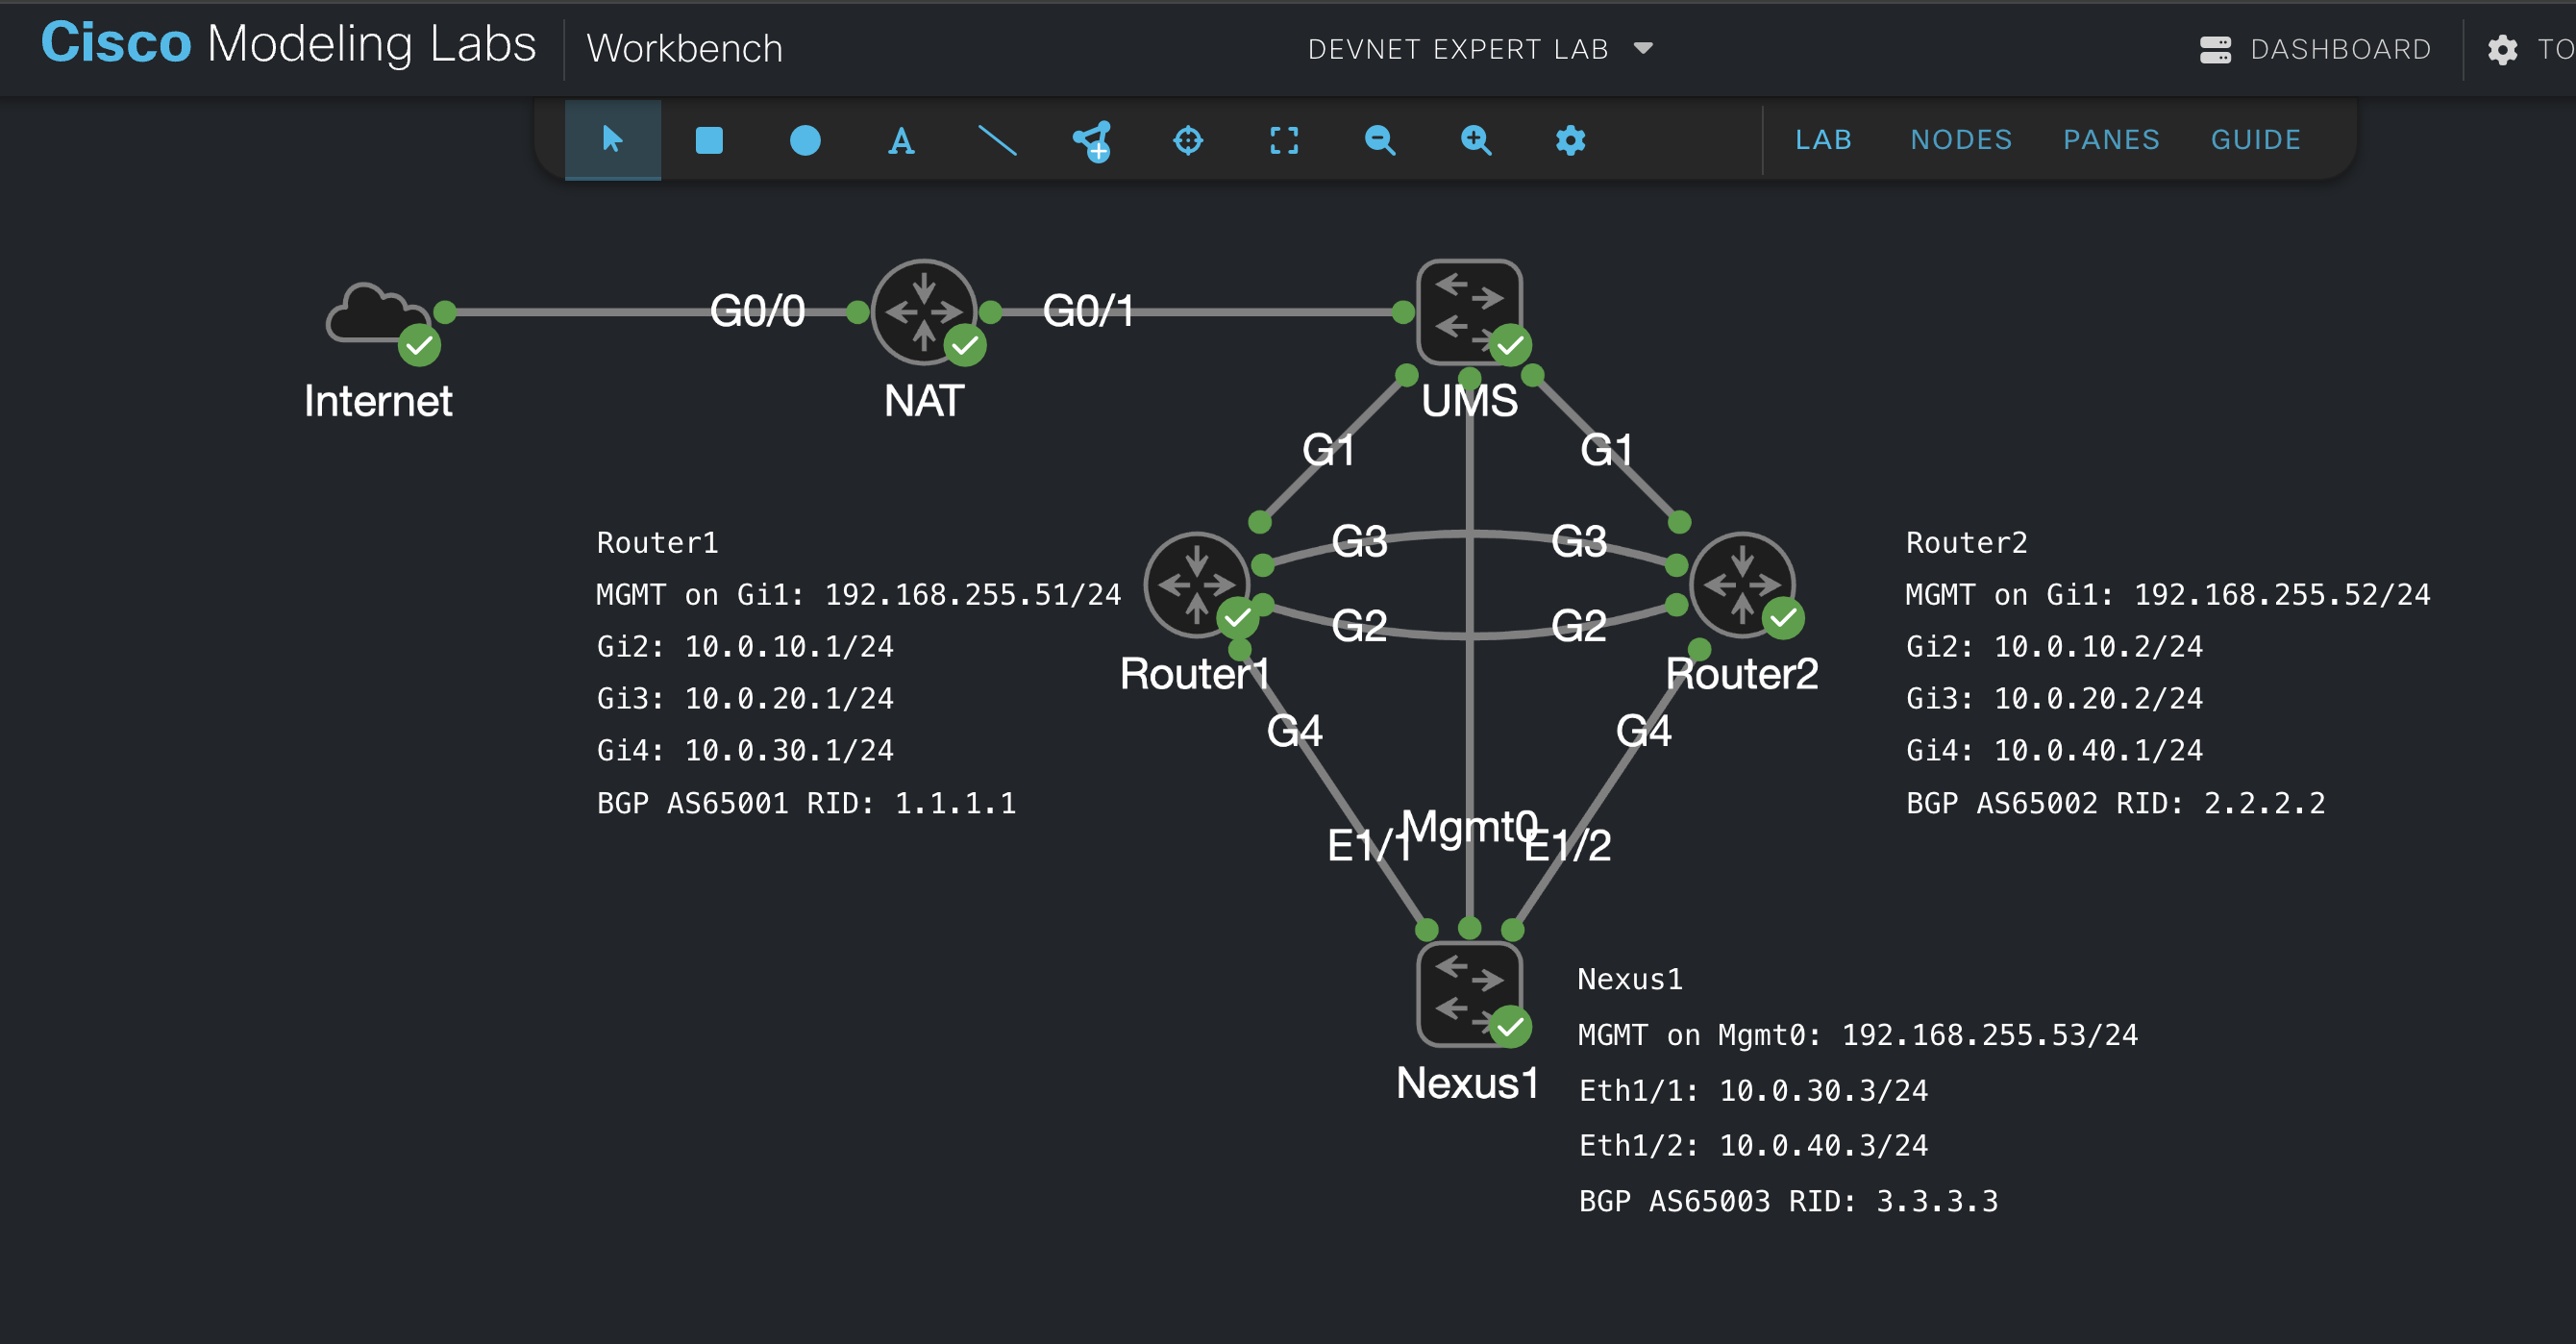 Screenshot 1: NETCONF Lab overview in Cisco Modeling Labs.
Each of the three devices which are Router1, Router2, and Nexus1, have their own BGP AS and neighbor configurations on all interfaces except the management interfaces. In my previous blog post I validated the changes using Cisco YANG Suite with the build-in function to run RPCs (Remote Procedure Calls) to the devices in the web browser. This is not a very efficient way to validate the configuration changes and BGP neighbors. Now let’s continue where I ended and validate that the configuration changes were applied in a programmatic way.
You can find all files from the examples used in the previous and this post in my GitHub repository netconf-example. If you face into any issues with the setup or if you found any errors please let me know and/or leave a comment using the GitHub issues.
A very quick and brief BGP neighbor state recap
First we do a short recap about the BGP neighbor states that we can understand the returned data before we move on. BGP uses the Finite State Machine (FSM) to maintain a table of all BGP peers and their operational status. The BGP session may report in the following states:
- Idle
- Connect
- Active
- OpenSent
- OpenConfirm
- Established
We want to see the Established state, because in this state, the BGP session is established and BGP neighbors exchange routes via Update messages. For more details about BGP take a look at the sample chapter BGP Fundamentals from the book Troubleshooting BGP: A Practical Guide to Understanding and Troubleshooting BGP available at Cisco Press.
Create a filter for IOS-XE using the Native YANG model
Now we will use a RPC get request to check the BGP neighbors. With the help of Cisco YANG Suite again we will create the filters which we will then use within our Python script, but let’s first check using the built-in RPCs function. As mentioned in the previous post, YANG Suite provides a set of tools and plugins to learn, test, and adopt YANG programmable interfaces such as NETCONF, RESTCONF, gNMI and more. I am using the DevNet Expert Candidate Workstation VM on which Cisco YANG Suite is already installed and is available on http://localhost:8480. The YANG module sets for IOS-XE and NX-OS we will use now are already configured. For installation option please refer to the Cisco YANG Suite documentation.
Please note that I mentioned about creating the YANG Sets during the previous post. Check the Getting Started section from the documentation. Create Device profiles and download the supported YANG models from the devices or upload YANG model files from your workstation or from public YANG Github repository at the Setup menu on the right. After that you can create YANG module sets for IOS-XE and NX-OS with the supported modules you need.
In YANG Suite go to Protocols –> NETCONF, select IOS-XE on the YANG Set from the Dropdown menu, search and select the Cisco-IOS-XE-native module and load the modules. Then choose the NETCONF operation, <get> in this case, and select Router1 as device. Before browsing through the YANG tree, click on the “YANG Tree -> Options” and choose NETCONF XML (RPC parameters only) from Display as RPC(s) as to show only the configuration payload parameters. We don’t need the other XML overhead.
Browse the YANG tree and look for the router container. Expand it and move on to the ios-bgp:bgp list element which also needs to be expanded. Then you will find the ios-bgp:neighbor list element. Click the checkbox in the value column and then generate the filter using the Build RPC button. The filter should look like screenshot 2 below.
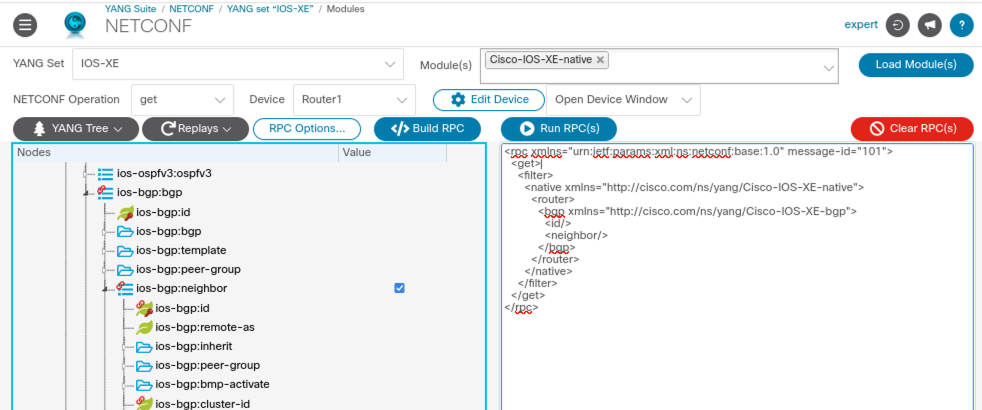 Screenshot 2: Validating BGP Neighbors.
Next click the Run RPC(s) button to use the filter. A new browser tab will be opened where you can follow the complete RPC with all details including the output data of the BGP neighbors.
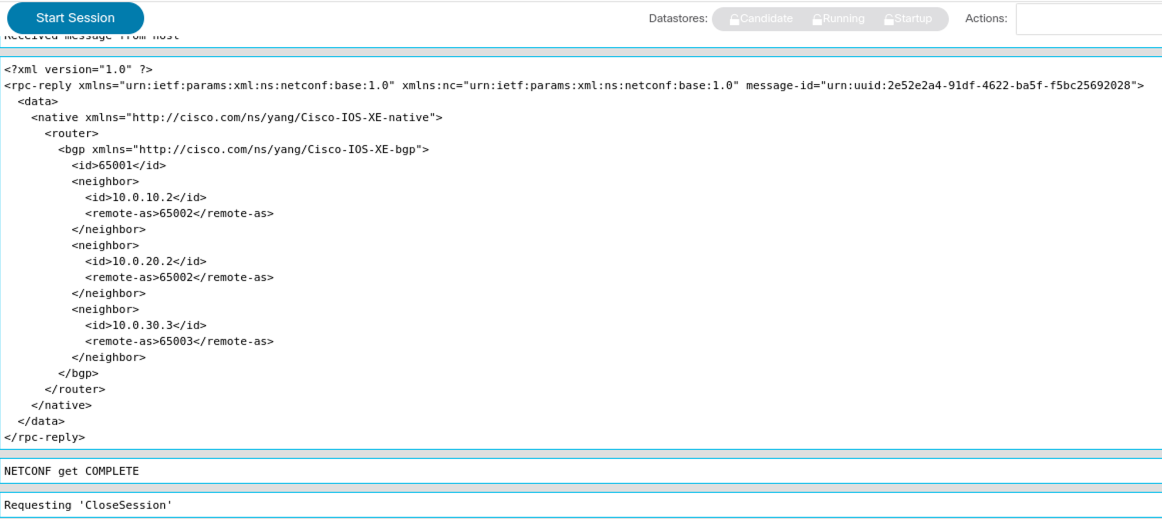 Screenshot 3: BGP Neighbors reply.
Looks good, right? The BGP neighbors are there. But wait, the output tells us that the configuration we pushed via NETCONF was applied to the device, but it does not tell us if it is also working and forming BGP neighbors. We used the get operation to request configuration data and not the operational data. This is similar to a show run command. It returns only the configuration data from the device.
Router1# show run | section bgp
router bgp 65001
 bgp log-neighbor-changes
 neighbor 10.0.10.2 remote-as 65002
 neighbor 10.0.20.2 remote-as 65002
 neighbor 10.0.30.3 remote-as 65003
Example 1: BGP configuration on a IOS-XE device.
Would it make more sense to request the operational data for the BGP neighbors? Yes, indeed! Let’s quickly switch to the operational YANG module which is called Cisco-IOS-XE-bgp-oper and load the module. Clear the RPC filter data using the red Clear RPC(s) button before creating a new filter. Expand the bgp-state-data and the neighbors containers and click the checkbox of the neighbor list element in the value column. Generate the filter using the Build RPC button and you should get the filter as shown in screenshot 4 below.
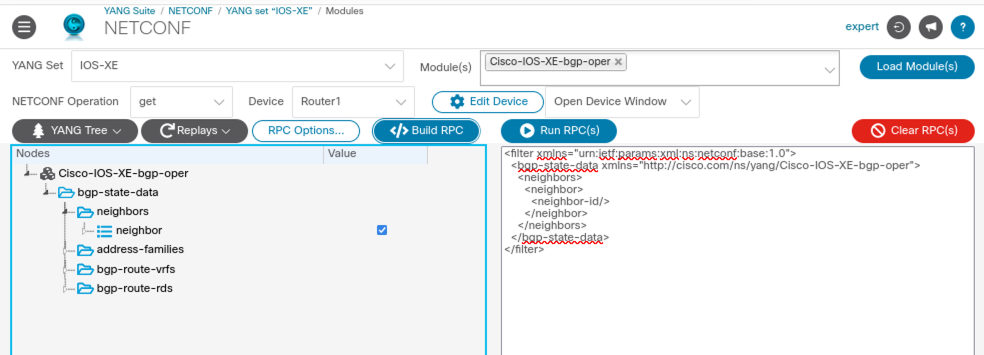 Screenshot 4: BGP operational neighbors filter.
Run the RPC using the Run RPC(s) button. Are you now overwhelmed about the reply data which came back as shown in screenshot 5 below? Building the correct filter to get the data you want from in the RPC reply is one of the steps during this process. Try to avoid getting amounts of unneeded data back in the reply. Depending on your environment it could be tons of data you get back and you don’t need the most of it.
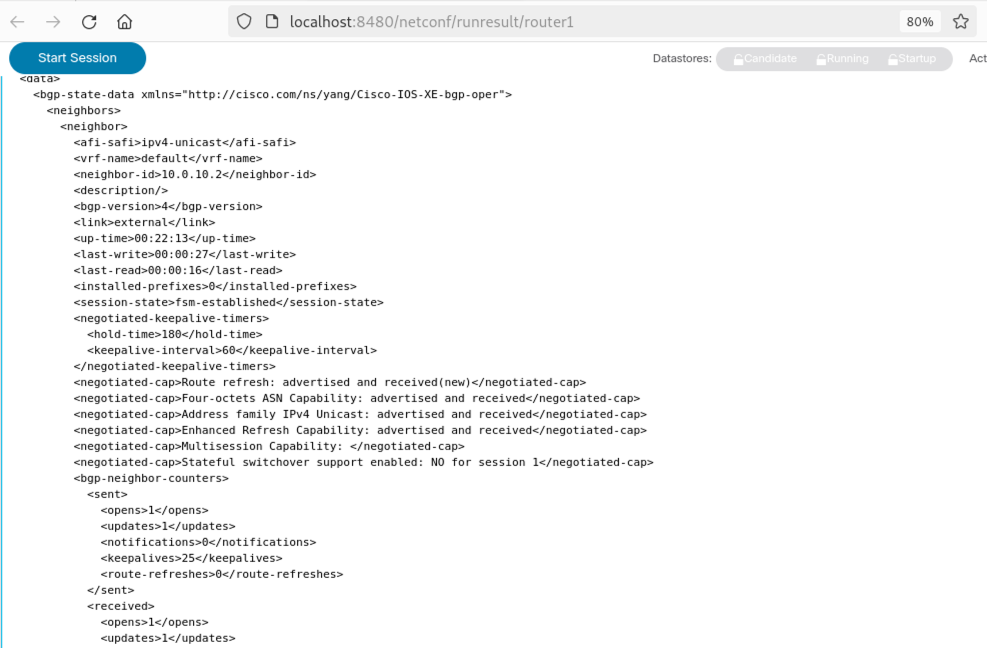 Screenshot 5: BGP operational neighbors full reply.
Let’s tweak the filter to minimize the data from the RPC reply as much as possible. For this expand the neighbor list element and click into the neighbor-id field and the session-state field in the value column, but leave both empty as show in screenshot 6. Clear the RPC field again and build a new RPC filter.
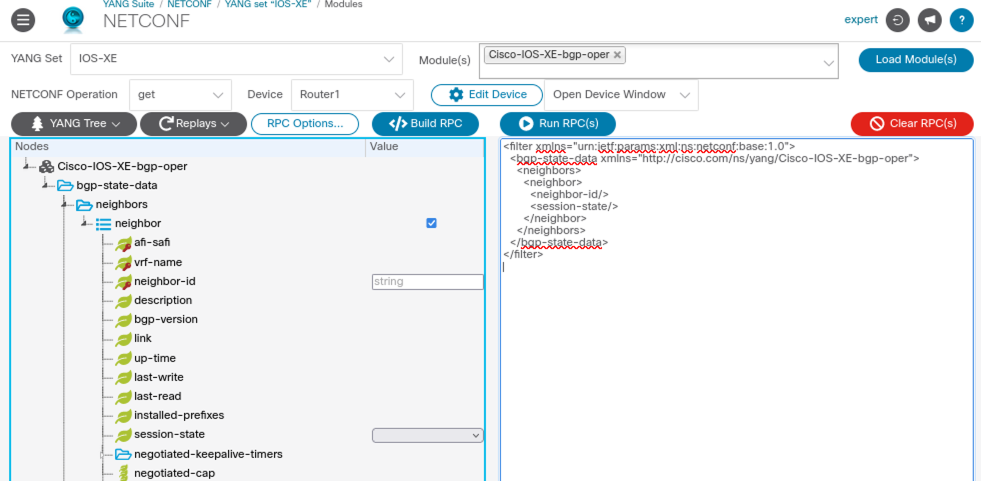 Screenshot 6: BGP operational neighbors filter on neighbor id and session-state.
Run the RPC again and we will get more effective reply data back as you can see from screenshot 7 below.
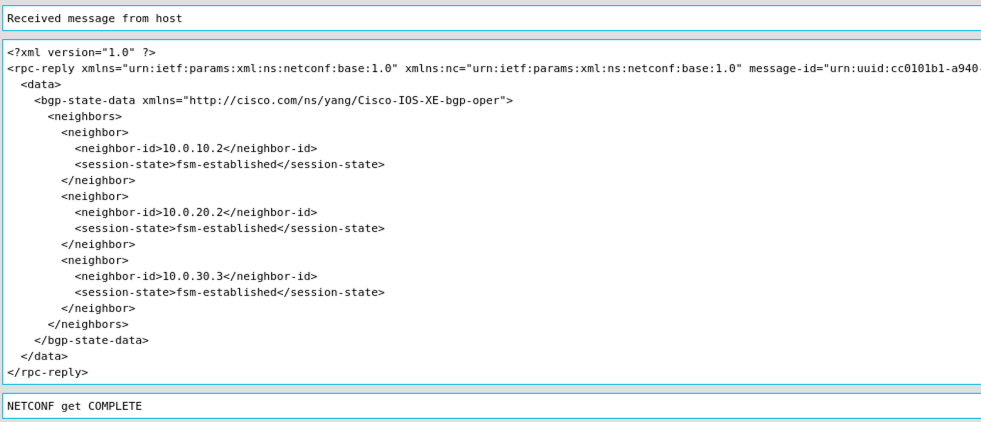 Screenshot 7: BGP operational neighbors reply with neighbor id and session-state.
The filter we will use later in our Python script should look like the code example below and it will force the RPC to filter on the devices BGP neighbors, but only returning the neighbor ID and the session state. It should make the reply more granular, more effective, and more consumable for us. The filter will be saved as XML file named native_bgp_neighbor_filter.xml in the filters folder.
<filter xmlns="urn:ietf:params:xml:ns:netconf:base:1.0">
  <bgp-state-data xmlns="http://cisco.com/ns/yang/Cisco-IOS-XE-bgp-oper">
    <neighbors>
      <neighbor>
        <neighbor-id/>
        <session-state/>
      </neighbor>
    </neighbors>
  </bgp-state-data>
</filter>
Example 2: BGP neighbor filter based on Cisco IOS-XE Native YANG model.
Create a filter for NX-OS using the OpenConfig YANG model
Like we did for the configuration part during the previous post, choose NX-OS from YANG Set, load the OpenConfig openconfig-network-instance model, and choose the <get> operation with Nexus1 as device. Move further down to the protocol list element under the protocols container. Expand the bgp and neighbors containers, mark the neighbor list element and click into the neighbor-address field without adding anything. Expand the state container and click into the session-state value field also without adding anything. Clear the RPC filter data using the red Clear RPC(s) button before creating a new filter using the Build RPC button.
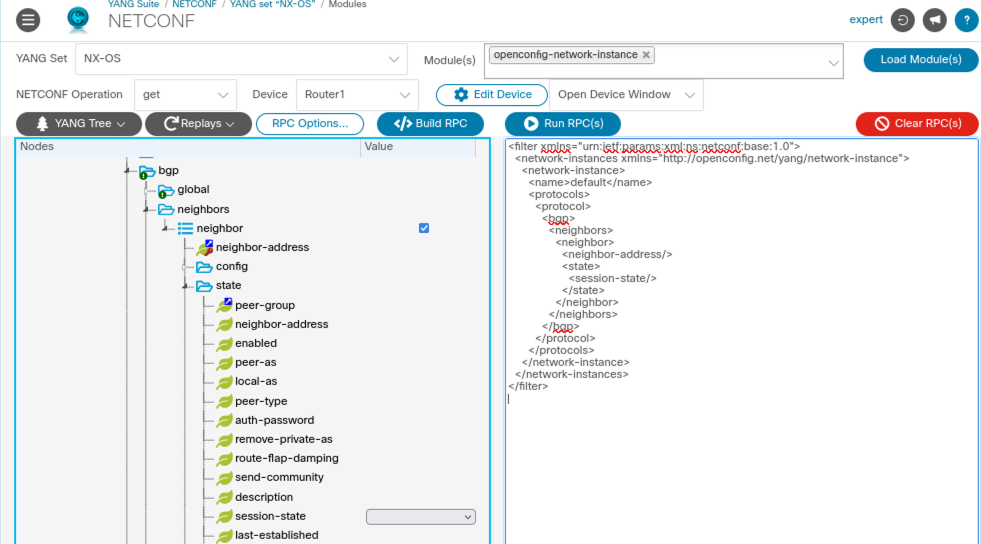 Screenshot 8: BGP operational neighbors filter on neighbor address and session-state.
The key name with the value default for the network-instance was added automatically, so in case you need to use another one you have to specify it. Run the RPC using the Run RPC(s) button.
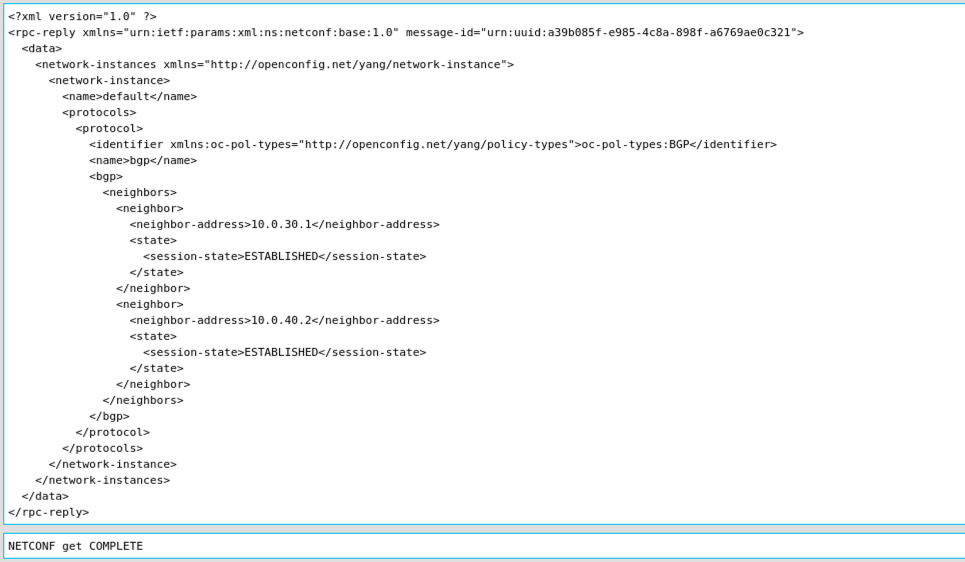 Screenshot 9: BGP operational neighbors reply on NX-OS.
Perfect! That looks very good. Now there is another cool thing I want to show you. Change the Device back to Router1 and run the RPC again without any other changes.
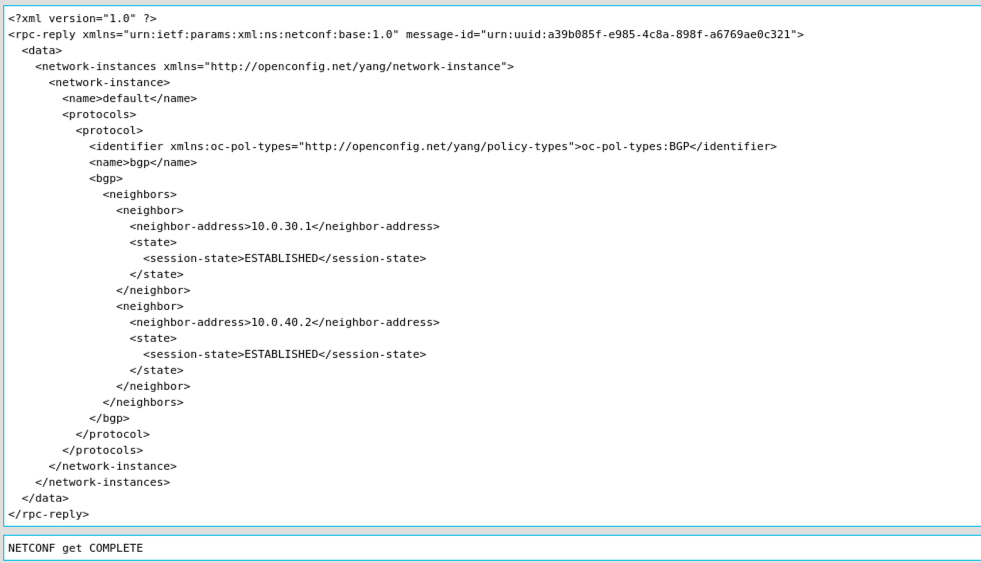 Screenshot 10: BGP operational neighbors reply on IOS-XE.
Isn’t it cool? You got also the BGP neighbors for IOS-XE Router1! Obviously you can use the filter based on OpenConfig YANG models on all supported platforms, in this case on NX-OS and IOS-XE. So with OpenConfig YANG models you could develop your filters and use it cross-platform. It is one important advantage as using OpenConfig YANG models to create filters.
The filter will be saved as XML file named openconfig_bgp_neighbor_filter.xml in the filters folder.
<filter>
    <network-instances xmlns="http://openconfig.net/yang/network-instance">
        <network-instance>
            <name>default</name>
            <protocols>
                <protocol>
                    <bgp>
                        <neighbors>
                            <neighbor>
                                <neighbor-address/>
                                <state>
                                    <session-state/>
                                </state>
                            </neighbor>
                        </neighbors>
                    </bgp>
                </protocol>
            </protocols>
        </network-instance>
    </network-instances>
</filter>
Example 3: BGP neighbor filter based on OpenConfig YANG model.
We built the filters for the validations and saved the files. The next task is to develop a Python script for the validation in a programmatic way.
Develop a Python script for validation
On top of the Python script we import the modules we need and define the list of devices using the IP addresses as you can see at example 4. The manager from ncclient will be used for the connection via NETCONF as we already know from the previous post. The etree module from lxml will be used to serialize the response data to an encoded string representation of its XML tree and then we will be able to use the xml.etree.ElementTree module to browse through the XML data. More details will you find at the The ElementTree XML API documentation page which provides some easy understandable examples.
'''Python script to validate configuration from XML payload via NETCONF'''
from ncclient import manager
from lxml import etree
import xml.etree.ElementTree as ET

# List of devices
devices = ["192.168.255.51", "192.168.255.52", "192.168.255.53"]
Example 4: The top of the Python script.
In example 5 we have the device_connect function which is pretty straight forward. The function takes the dev variable which is the IP address from the devices, uses the ncclient manager to connect to the device, and returns the connection state back.
def device_connect(dev):
    '''Function to connect to the devices'''

    con = manager.connect(
        host=dev,
        username="expert",
        password="1234QWer!",
        hostkey_verify=False
        )
    return con
Example 5: The function to connect to the devices.
For getting the BGP neighbors from the devices we have the get_bgp_neighbors function which uses the connection state variable con and the NETCONF filter variable. The response data will then be converted to a XML string using the etree.tostring function and return the data.
def get_bgp_neighbors(con, filter):
    '''Function to get BGP neighbors based on filter and return data'''

    # Get BGP neighbor state data
    response = con.get(filter=filter)

    # Convert response data to XML string
    data = etree.tostring(
        response.data_ele,
        pretty_print=True
        ).decode()
    return data
Example 6:
Thanks to Kirk Byers IOS-XE and NETCONF Candidate Configuration Testing, Part1 blog post, especially the section for Grabbing the XML Configuration was very helpful to get an idea how to convert the XML reply data.
The first part of the main function as shown in example 7 starts with a loop iterating over the devices list and calling the device_connect function using the device IP address named device as variable. Then we need to determine which filter we want to use as variable named yang_type. In case of the NX-OS device with IP address 192.168.255.53 we use the filter from OpenConfig YANG models and for both IOS-XE devices we use the IOS-XE Native YANG model. For browsing through the XML data tree using the ElementTree XML API we also need to specify the correct URL path based on the YANG model which we will use later. Then we open the appropriate filter file from filter directory and assign it to the netconf_filter variable.
if __name__ == '__main__':

    # Loop through the devices and connect to it
    for device in devices:
        connect = device_connect(device)

        # Choose which filter and YANG model path to use
        if device == "192.168.255.53":
            yang_type = 'openconfig'
            url = '{http://openconfig.net/yang/network-instance}'
        else:
            yang_type = 'native'
            url = '{http://cisco.com/ns/yang/Cisco-IOS-XE-bgp-oper}'

        # Open file for NETCONF filter
        with open(f'filters/{yang_type}_bgp_neighbor_filter.xml') as file:
            netconf_filter = file.read()
Example 7: The main function part one.
The second part of the main function as shown in example 8 starts with calling the get_bgp_eighbors function and declaring the root of the XML data from the xml_data variable. Then we can browse through the XML reply data based on the YANG model we used before.
        # Get XML data and read
        xml_data = get_bgp_neighbors(connect, netconf_filter)
        root = ET.fromstring(xml_data)

        # Browse through the XML tree and print all neighbors with state
        print(f'\nBGP neighbors for {device}:')
        if device == "192.168.255.53":
            for neighbor in root[0][0][1][0][2][0].iter(f'{url}neighbor'):
                address = neighbor[0].text
                state = neighbor[1][0].text
                print(f'Neighbor {address} -> {state}')
        else:
            for neighbor in root[0][0].iter(f'{url}neighbor'):
                address = neighbor[0].text
                state = neighbor[1].text
                print(f'Neighbor {address} -> {state}')
Example 8: The main function part two.
We need to climb down the latter of XML data, in case of the NX-OS device with IP address 192.168.255.53 the neighbors we need to iterate over are located at root[0][0][1][0][2][0]. The variable for address can then be assigned using the neighbor[0].text because it is the first element in the neighbor list. Same goes for the state where we need to use the second element from the neighbor and the first element from the state which is then neighbor[1][0].text. In screenshot 11 you will see how we get there.
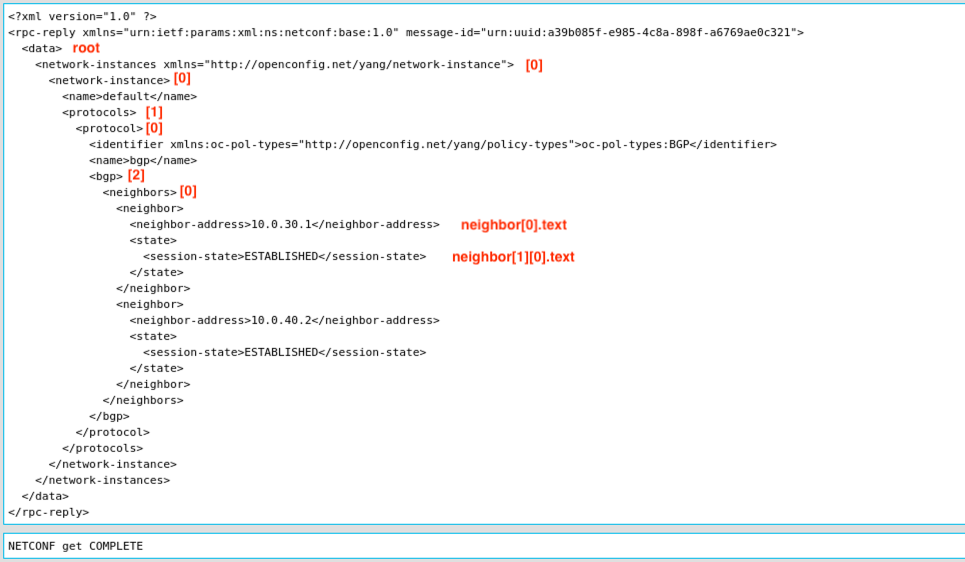 Screenshot 11: BGP Neighbors from root XML data reply for OpenConfig YANG.
In case of the Native YANG model and the IOS-XE devices the XML data reply tree is a little bit easier to climb down as you can see from screenshot 12. The neighbors are located at located at root[0][0] with the neighbor as the same as for NX-OS with neighbor[0].text and the state as neighbor[1].text both on the same level.
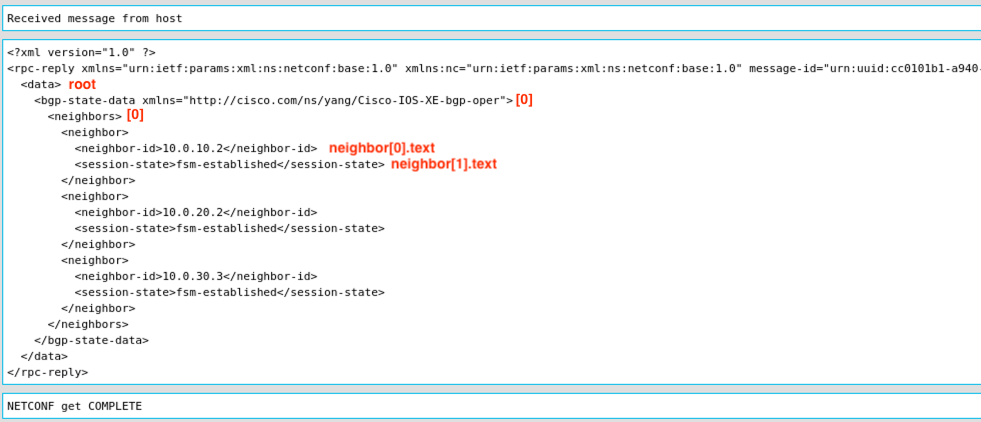 Screenshot 12: BGP Neighbors from root XML data reply for Native YANG.
Alright, we are ready to move on with the final part, bring everything together, and validate the BGP neighbors.
Finally validate the BGP neighbors
Let’s quickly recap what we have now. The complete Python script was saved as netconf_validate.py in the main directory of the repository. Before that we created the filters which are saved as native_bgp_neighbor_filter.xml from example 2 for the IOS-XE Native YANG model and openconfig_bgp_neighbor_filter.xml from example 3. Both filter files are located at the filters directory.
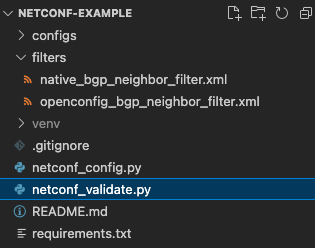
Screenshot 13: GitHub repository files.
Please make sure to follow the instructions from the GitHub repository netconf-example before running the validation script. At this time the configuration was already applied as described on the previous blog post NETCONF XML Payload with YANG models.
Let’s run the Python script and validate the BGP neighbors:
(venv) $ python netconf_validate.py

BGP neighbors for 192.168.255.51:
Neighbor 10.0.10.2 -> fsm-established
Neighbor 10.0.20.2 -> fsm-established
Neighbor 10.0.30.3 -> fsm-established

BGP neighbors for 192.168.255.52:
Neighbor 10.0.10.1 -> fsm-established
Neighbor 10.0.20.1 -> fsm-established
Neighbor 10.0.40.3 -> fsm-established

BGP neighbors for 192.168.255.53:
Neighbor 10.0.30.1 -> ESTABLISHED
Neighbor 10.0.40.2 -> ESTABLISHED
Example 9: Validating the BGP neighbors.
Excellent! All devices showing established sessions between their BGP neighbors. I hope it was again easy to follow and to replicate on your own setup. Here are the links to the previous blog post NETCONF XML Payload with YANG models and the GitHub repository netconf-example with all files again. Please let me know using Github issues if you faced into any issues with the setup or if you found any errors.
Thank you for reading this blog post and following along until the end. Please leave a feedback in the comments!
Comments
Post comment